The Hebridean Islands of Harris and Lewis - Revisited (part 1 of 2) |
Setting the scene: Wow, just wow! Normally I write a short leading commentary to all my free online chapters, that I hope will set the scene and inspire you to want to come here and photograph, all of these amazing Scottish locations I am highlighting. But for this chapter and the many locations described within it, all I feel the need to say to you to fully describe them, is WOW! How to get there: If you have visited this site before and read some of the earlier free chapter guides? Then you may know that I have already covered, all of the Outer Hebridean archipelago from top to bottom (now called the Outer Isles, or the Western Isles, or the Small Isles, for some unknown reason that is beyond me?) and which you can read here. But I took the images for that 3 part guide, way back in the 2010's and so thought it was about time, I went back to the Isles of Harris and Lewis, to do them more justice. By concentrating on them both of these individual areas alone and in a lot more detail. As well as to try out a few different ideas. |
|
|
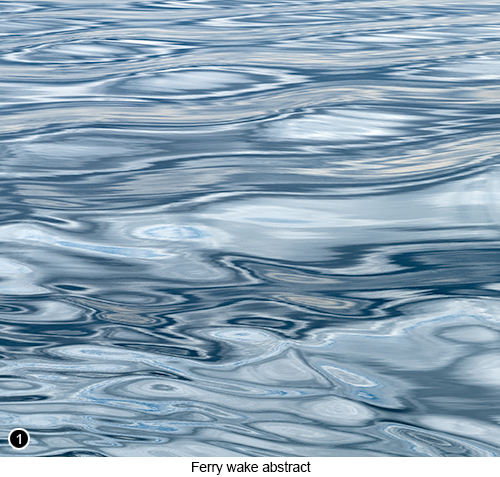
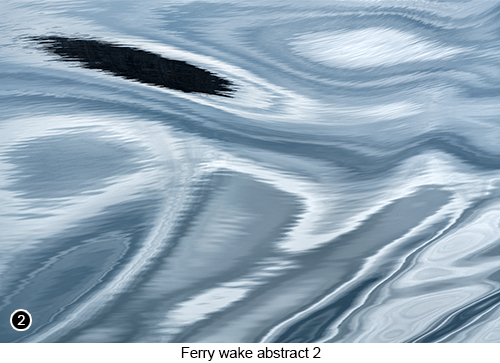
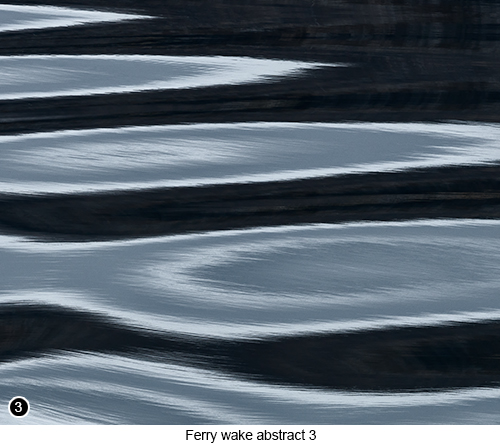
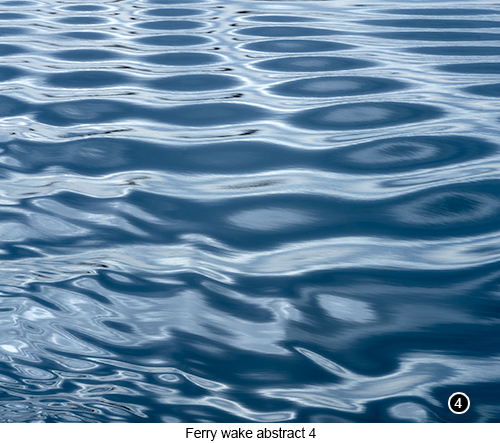
First of all, I will assume you are sailing over to the Island of Harris and Lewis by ferry, by making your way across the 'Little Minch', from the Uig ferry terminal on Isle of Skye. So again, assuming that you have already made your way up to and then onto the Isle of Skye. If you then continue driving into the island, along the A87 after crossing over the Skye Bridge. Just keep heading North on the A87 and all the way up towards the main ferry terminal at Uig, 52 miles further North up the Island. The village of Uig is pronounced locally as "Oo-wig" by the way, but where the "Oo" part of the name is pronounced like "who", but without the "h"). Isle of Skye ferry terminal at Uig, Map view, Street view. Then once on the ferry, for your 1 hour 40 minute sailing across to the Isle of Harris and if the sea is calm(ish), then get ready to shoot the wake behind the ferry, with your 70/200 lens mounted on the camera. So get up onto the viewing deck at the back of the ferry as quickly as you can, then as the ship steers a curved route out of the harbour, start shooting the arcing wake behind the ferry and the amazing abstracts that the waves will be creating for you. As shown here in SHOTS 1, 2, 3 and 4. But don't worry if you can't find anything to shoot leaving Uig, because when the ferry arrives in the port of Tarbet on Harris, it has to meander its way around several small islands, before it gets into port. So there should be plenty of opportunity, to shoot wake abstracts at this point as well. Also on the crossing over the Little Minch (what the body of water, between Skye and the Outer Hebrides is colloquially known as), you will find there will be plenty of opportunity, to shoot the various islands and the weather out at sea. As well as lots of wild life, such as seabirds, otters, dolphins and porpoise etc. Isle of Harris ferry terminal at Tarbet, Map View, Street View. You are also going to need to select a fast shutter speed, when capturing these types of wave abstracts, of around 1/200th of a second or higher. To stop the movement of the waves and freeze them in motion. You will also want to use a deep depth of field, of at least f/16. Because you will be shooting the wake abstracts, relatively close to the |
|
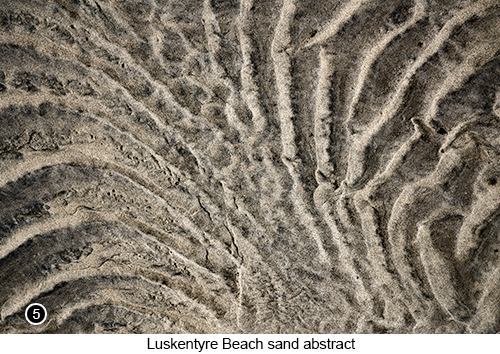
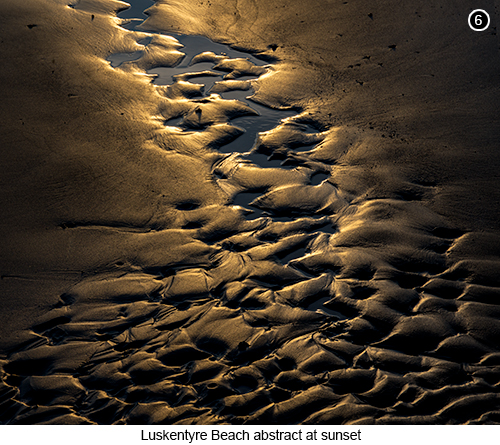
back of the boat, as well as in an almost horizontal plane. So if it is a bright sunny day, then you will have no problem achieving these settings. But on overcast days with less light, you will just have to bump up your ISO to overcome this. Then once on the Isle of Harris and coming out from the ferry terminal at Tarbet, drive up onto the A859 and turn left, heading towards Roghadal. As you now head towards the Luskentyre and Seilebost beach areas of Harris, 10 miles further on. And prepare yourself to start uttering words like "Wow" and "OMG", a lot, Map View, Street view The journey from the ferry terminal at Tarbet on Harris, to the Luskentyre beach area, is around 25 miles, that takes around 25 minutes to complete. Then as you drive over the top of a rock and boulder strewn hill, then down the hill towards Luskentyre. You will now be able to see, the wide flat beach area (at low tide of course) in the far distance and the jaw dropping photographic potential of the area. You will then arrive at the single track, Luskentyre beach road on your right, Map view, Street view. So turn right here and drive along this unnamed road, for another mile and a half, until you reach a grass covered car parking area on your left, with enough space for around 4 vehicles, right at the side of the beach, Map view, Street view. At low tide if you go down onto the beach here (with your 24-105mm lens mounted), you will find lots of abstract opportunities around to your right next to some rocks, of the various random patterns in the two tone colours of the sand, that the outgoing tide will have left on the beach, as shown in SHOTS 5 and 6 below. |
|
|
|
You will also find piles of white seashells, strewn everywhere across the beach in this location, which again are worth a shot or two. I found the best lens to scout around in this area looking for sand abstracts, was my 24-105 zoom. With the zoom being ideal for getting me close into the details if I needed to, as well as allowing me to zoom out and widen my point of view, to fully frame up my chosen compositions. All the water in this large sea basin, drains out through a narrow channel alongside these rocks on the right of the beach, where you now are. Which is why there are so many deep rutted channels and weird shapes in the sand to photograph. It can also get a bit squishy under foot like quicksand in this area. Not dangerous, but definitely deep enough to suck the boots straight off your feet. So be mindful of this, when wandering around here looking for compositions and stay away from the edges of the deeper pools of water. |
|
Now having finished shooting your abstract shots of the beautiful sand patterns and the wider views of the beach. Go back the way you came in on this single track road and all the way back to the main A859 road and turn right. There is no street sign here telling you where you now heading, but trust me and just turn right and follow the edge of the Luskentyre beach area, now on your right, Map view, Street view. |
 |
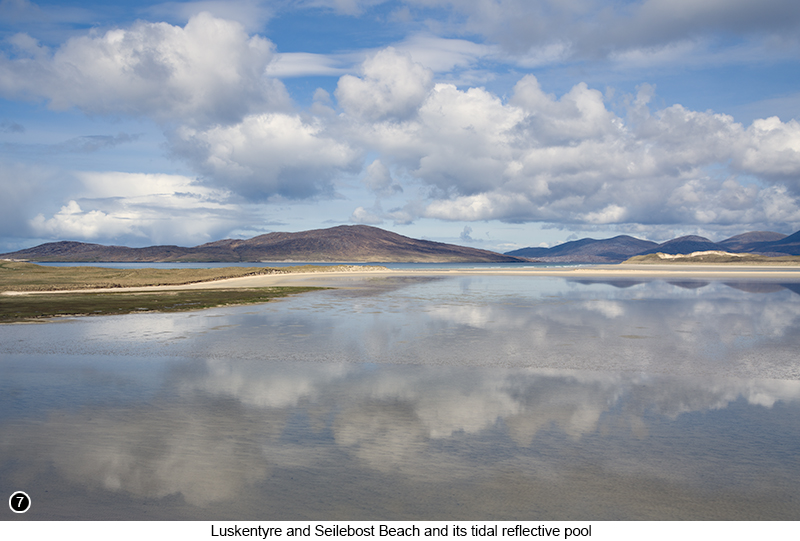
Then a couple of miles further on, you will eventually come to a small, unofficial, grassed covered parking area on your right. That sits right next to the edge of a steep bank overlooking the beach and where you can get some amazing and very wide angled reflection shots, of the entire sea basin in front of you, Map view, Street view. This unofficial parking area is not marked, so you will need to keep your eyes peeled to see it - there was a sign next to this spot when we were last there, saying no overnight camping or something, but other than that nothing. So pull into this parking location and make sure, that you have driven your vehicle completely off the road. You can actually drive up to the top of the small bank of grass, at the top of this parking area if you wish and shoot the scene from up there, as shown in SHOTS 7 and 8 below. |
|
 |
|
The sand is so light in colour on these beaches and sitting just beneath the water at this point of the outgoing tide, that it will be reflecting most of the light hitting it, back up through the water. So the usual thing, where the water in any of your previous reflection shots, is invariably going to be darker than the sky, is no longer true for this location. As the water will now appear to be lighter than the sky, if photographed at this point of the outgoing tide of course. Which as far as I am aware, is a phenomenon you don't often see, let alone get the chance to photograph. However, as we were travelling in only one vehicle, I always parked at the bottom of this small, banked, grass covered area, then walked up to the top of the small hill with my kit, to set up and shoot from there. Just to make sure that no one drove in behind me and blocked us in. But if there are several of you travelling together in more than one vehicle, then you should still find plenty of room park here, all at one time. |
|
 |
|
To get the best shots of this view, of the Luskentyre/Seilebost beach area with its tidal pool, as shown in SHOT 7 above, you need to be here about 2 to 3 hours after the highest point of the tide. As the whole of the Luskentyre sea basin area, will have had chance to almost but not quite, drain back out into the sea, through a small deep channel on the opposite shoreline. Which is where you were just shooting your sand abstracts, like the one shown in SHOT 5 above and is what helps to create these weird patterns. So if you have timed it correctly, you will now see that the whole of this large, flat foreshore basin area, will have slowly draining out, to the point where it is down to only a few inches deep. As such, the whole of this basin will momentarily, turn into a gigantic reflective pool, that I know you will really want to photograph. This reflective process, also seems to occur even if it is a windy day. Which must be due to the shallow depth of the water at this point and how it is still being drawn quickly back out into the sea. |
|
|
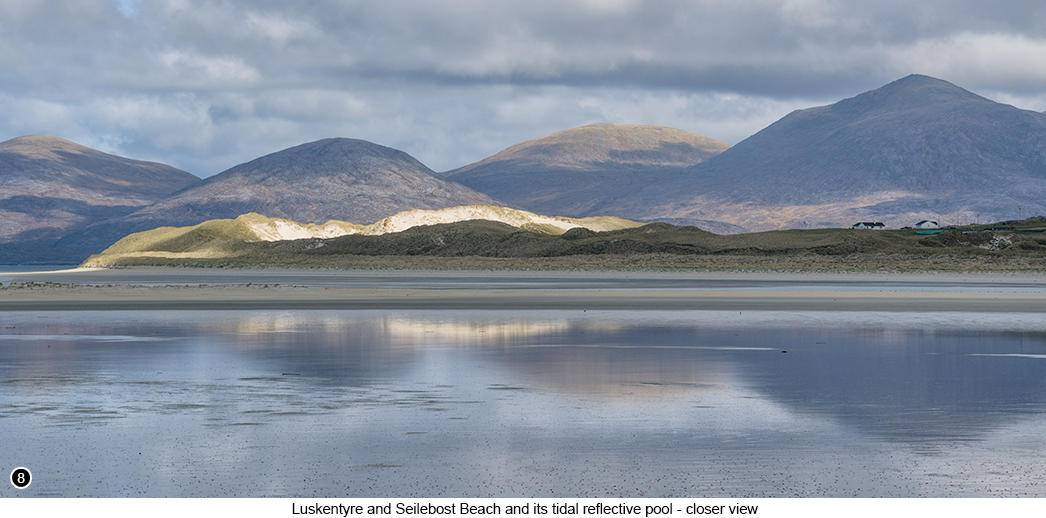
Obviously this draining out process continues unabated, until the whole of the basin is back to open sand, as can be seen to be happening in SHOT 8 above. So the timing for this part of your shoot, is absolutely critical. As this point of maximum reflection, due to shallow depth of the water still remaining in the basin, only lasts for about 10 minutes. But when it is at its peak, it looks absolutely stunning. So I do advise that you make the effort to be here at just the right time, because it really is worth it. And even if you don't manage to get any useable shots of it for some reason, then it is still definitely worth being here just to witness it happening. I also had the luxury of having brought two cameras with me. So for this part of the shoot, as shown in SHOTS 7 and 8 above. I set one up on the tripod with my 70/200, at the top of this grassy bank. Then stood at the side of it hand holding my second camera, so I could shoot the scene quickly, both long and wide at the same time. Then having got your shots of this large reflective pool effect, get back into your vehicle and return to the main A859 and turn right heading North. Until just around the next right handed bend, you will see a single track road turn off on your right, signposted for the Seilebost School. So turn right here and drive to the end of this track, which will then lead you to the Seilebost Beach public parking area. Map view, Street view. It doesn't tell you on any of the road signs, what you should expect to find down this single track road, other than the entrance to the school. Even though it does |
|
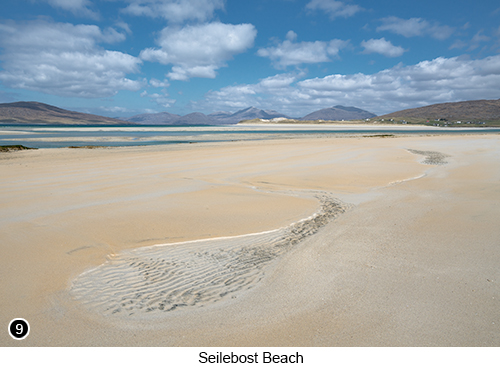
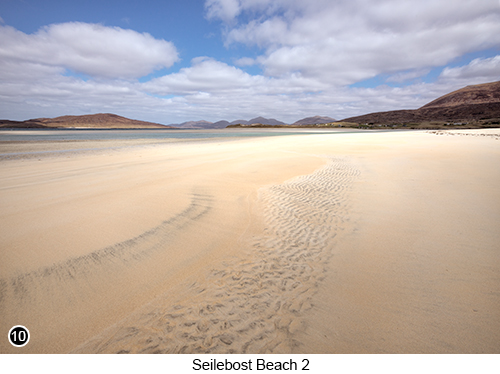
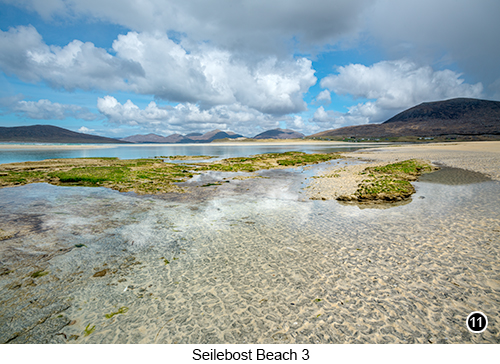
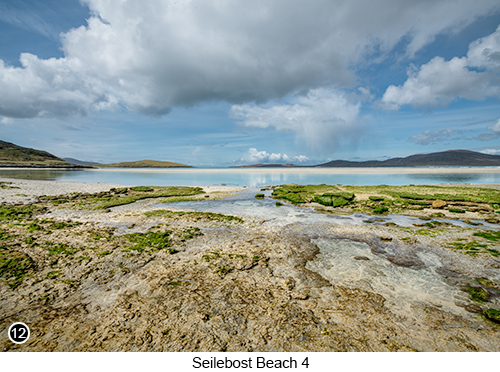
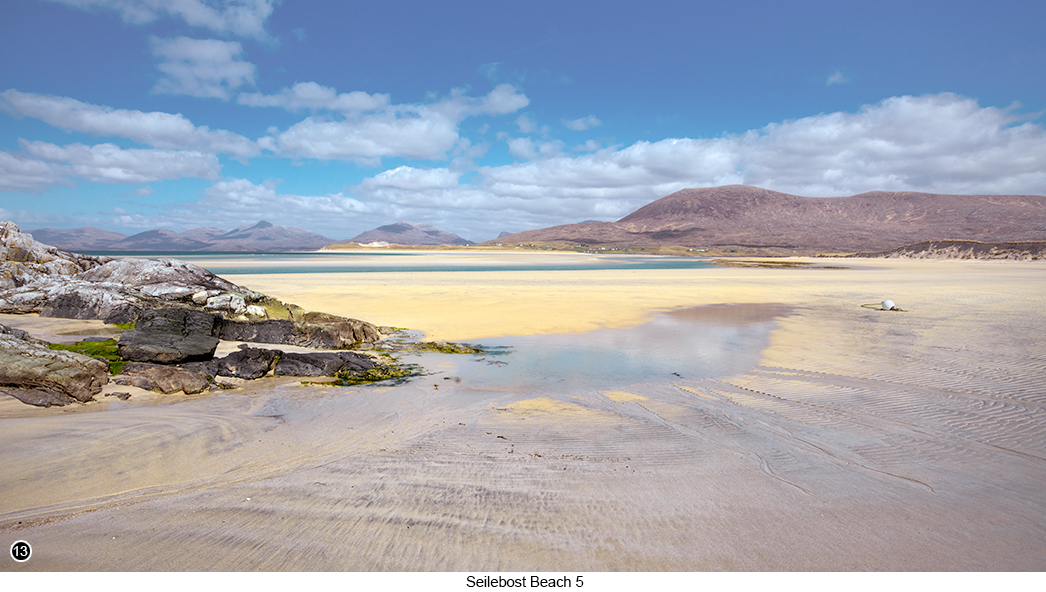
actually lead down a large, official, grass covered public car parking area and camping site, used mainly by camper vans. So continue down this unnamed side road for a couple of hundred yards and park wherever you can, nearest to the furthest edge away from where you came in and to the right of the school, Map view, Street view. You will then see at the far end of the car park to your front left, there is an open entrance through a fence, that leads to a field and several very lightly trodden paths through the dunes and the marram grass. So grab your camera, wide angle lens and tripod and head out through the gate towards the beach. Once at the top of the beach, you will see a wide open view of a beautiful, pristine sandy area, that will make your jaw drop and think wow, I must have just stepped through a space wormhole or something and come out on a beach in Barbados. With beautiful white(ish) coloured sands and crystal clear seas and lots and lots of photo opportunities, in every direction you care to look. As shown in SHOT 9 above, Shot 10 to the right and SHOTS 11, 12 and 13 below. I found that the optimum time to be here for photography, was around an hour or so after high tide. This will mean that the beach is still not yet fully exposed, or had to time to become covered in foot prints from local dog walkers. Also, if you walk a little further around to your left, you will find there are lots of smaller reflective pools, still surrounding the various low lying rocky seaweed covered areas, next to the sea. I then slowly worked my way along the left of the beach, shooting constantly, until I eventually reached a low lying outcrop of rocks, next to a small burn (stream) running through the sand, at the far end of the beach, as shown in SHOT 13 below . |
|
| But before you rush into this area, giggling manically with photographic glee and anticipation. Think about where you are going to be walking first, as you don't want to ruin your own shots, by immediately stomping through the middle of it it with your size 10 boots. Because at this point, everything will still look pristine, fresh and stunning. So don't wreck it, before you've at least had the chance to scout out the best compositions and then shoot the heck out of them. So I would advise that you begin by scouting your way along the upper part of the beach, nearest to the edge of the dunes, by sticking to the top of the beach wherever you can. Then only begin to move down and in towards the edge of the outgoing tide, when you see your next composition. Then work your way down to your chosen composition, by slowly shooting your way closer in towards it. | |
|
|
| You will probably need to allow yourself at least a couple of hours and probably much more than that, on the Luskentyre/Seilebost beach. Also the views you are capturing, will look much more beautiful and photogenic, if the sand is being lit at least in part, by some direct sunlight from over your shoulder (the direction the sun will be shining), as well as with a few nice puffy clouds in the sky. As this will make the whiteish coloured sand really begin to glow and reflect all that beautiful soft light, back up into the clouds. God, I was only there on Luskentyre beach about a month ago as I am writing this, but reliving these moments with you now, is making me want to go back there immediately... |
|
 |
|
You know there are quite a few well known locations around the world, where us landscape photographers feel that we have to go to and shoot at some point in our lives, as a sort of homage to landscape photography. Such as Machu Picchu in Peru, Banff in Canada, Angkor Wat in Cambodia, Milford Sound in New Zealand etc., etc. Well I would definitely put the Isle of Harris as a whole, but with Luskentyre and Seilebost beach in particular, firmly in that "Must photograph before I die" bucket list and right up there with any of the worlds greatest views. But then, when you also add in the many sights and photographic opportunities, that can be found on the adjoining Isle of Lewis just up the road, then it really does become a total no brainer. |
|
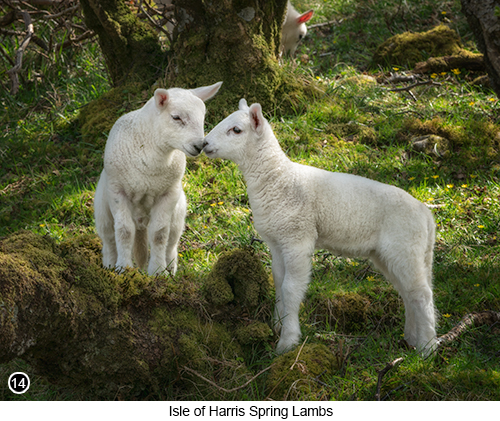 |
But what makes the Isles of Harris and Lewis even more interesting, is that not that many people seem to come here to photograph them. Yes I am sure you will have probably heard of Luskentyre Beach before, when surfing the net looking for new locations to go to, which is probably how you found this web site. But I also bet that the Luskentyre and Seilebost Beach areas on the Isle of Harris, have never been part of your top photographic locations "to do" bucket list. But they should be. So having now shot this area of Luskentyre, go back to your vehicle and then drive back up and out onto the A859 and turn right, Map view, Street view. As I now take you deeper into the islands, to yet more gob smacking locations. Tip: it might be worth mentioning at this point, that if you can time it to be here during the last week of April. Then you will also have the chance to see and photograph. "fresh out of the oven", wobbly legged, newborn baby lambs, frolicking and boinging around everywhere in front of you, as shown in SHOT 14 to the left. You will see them running around in the fields, in people's gardens, on the beach and even jumping around spring like on the roads directly in front of you and then running off to their moms to comfort suckle, as soon as they realise you are there. So if you think you might enjoy being surrounded, by cuteness in every direction and spending lots of your time saying things like, "oh good grief, that one must only be a few minutes old and so sweet I just want to hug it". Then try to time your visit here for the last week of April. Where as well as the abundance of spring lambs absolutely everywhere, you will find that both of the islands are still pretty much void of tourists. To read Part 2 of this photographic tour around the Isles of Harris and Lewis, click on the link below. Or if you wish to read my original guide, which describes the entire Outer Hebridean archipelago from top to bottom, click here. |
Exif information for each of the numbered shots shown throughout this chapter --1 - Canon EF70-200/2.8L IS USM, 1/320 Sec, f/16, ISO 100, Focal Length 200mm, taken on 20th Apr at 13:06 --3 - Canon EF70-200/2.8L IS USM, 1/320 Sec, f/16, ISO 100, Focal Length 200mm, taken on 20th Apr at 13:15 --4 - Canon EF70-200/2.8L IS USM, 1/320 Sec, f/16, ISO 100, Focal Length 200mm, taken on 20th Apr at 13:22 --5 - Sigma 24-105mm F4 DG OS HSM | Art, 1/80 Sec, f/13, ISO 250, Focal Length 57mm, taken on 20th Apr at 16:44 --6 - Sigma 24-105mm F4 DG OS HSM | Art, 1/80 Sec, f/11, ISO 350, Focal Length 43mm, taken on 21st Apr at 19:48 --7 - Sigma 24-105mm F4 DG OS HSM | Art, 1/500 Sec, f/11, ISO 100, Focal Length 38mm, taken on 26th Apr at 10:58 --9 - Canon EF16-35/2.8L USM, 1/400 Sec, f/16, ISO 200, Focal Length 26mm, taken on 24th Apr at 10:42 --10 - Canon EF16-35/2.8L USM, 1/400 Sec, f/16, ISO 200, Focal Length 17mm, taken on 24th Apr at 11:29 --11 - Canon EF16-35/2.8L USM, 1/160 Sec, f/16, ISO 100, Focal Length 19mm, taken on 24th Apr at 11:46 --12 - Canon EF16-35/2.8L USM, 1/250 Sec, f/16, ISO 100, Focal Length 17mm, taken on 26th Apr at 11:29 --13 - Canon EF16-35/2.8L USM, 1/400 Sec, f/16, ISO 200, Focal Length 21mm, taken on 24th Dec at 11:50 --14 - Canon EF70-200/2.8L IS USM, 1/125 Sec, f/13, ISO 200, Focal Length 200mm, taken on 25th Apr at 10:35 |
|
If you have enjoyed reading these 'Extra' chapters to my Guide Book and think you might also enjoy reading 79 more chapters across 270 pages, that also includes more than 340 Fine Art quality images, along with detailed descriptions and large scale maps to guide you to the exact location of where I took each and every one of them and which then goes onto discuss the techniques and tools I used to process them, but where everything is written in plain easy to understand English? Then please consider buying the Book. |
|