Stac Pollaidh and Further North Beyond Ullapool - (Part 2) A Crumbling Ancient Rocky Outcrop, with Magnificent 360 Degree Views Over the Surrounding Area of Assynt |
|
|
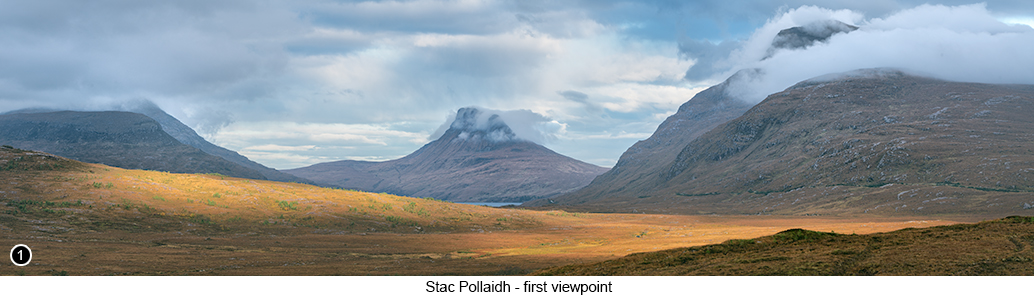
Setting The Scene - Stac Pollaidh, which refers to the central peak shown in image ONE above and image TWO below, is actually the relatively recent Gaelic name given to this 2,000 foot high rocky outcrop and is thought to have been derived from the earlier Gaelic term that locals used to use to describe this peak as "An Stac", which roughly translates into English as "The pinnacle". But when this area was finally being mapped out for the first time by a British ordinance map surveying team at the turn of the previous century, it then suddenly and for reasons not known today, became identified on their maps as "Stac Pollaidh", whereby 'Pollaidh' meaning 'Pool' was added to its name, to then describe it as the 'Peak' above the 'Pool'. But this longer name didn't sit so well with the locals, so they simply truncated it to "Stac Polly" and which then became the name by which it is now commonly known throughout Scotland. And for those of you who would like to attempt the three hour round trip hike up to the top of this peak, so you can photograph the amazing 360 degrees views that can been seen from up there, then I will of course be providing you with map links to the Stac Polly car park in the following "How to get there" section. So for those of you who have already read all the additional chapters I have written so far in these supplemental 'Extra Chapters' to my Photographer's Guide Book and who are probably beginning to wonder where is the accompanying story of misfortune, myth or some other type of Ghostly happening that has been historically associated with Stac Polly? Well I am afraid there aren't any, or at least not that I can find easily, but which I am sure there will have been in the past, but which must have now been lost through the passage of time. However all is not lost, as there is another ancient legend that has been repeated many, many times around this area, as well as throughout the rest of Scotland and is the legend of the fearsome blood hungry "Baobhan Sith" (pronounced locally as Barrvan See). The Baobhan Sith are described in folklore as mystical malevolent creatures, who to gain easier access to their victims, will take on the form of a beautiful young woman with long straight hair and who choose to prey mainly on young men and preferably ones that are travelling alone. But if you think the Baobhan Sith sounds like something similar to your average blood sucking vampire, then oh no they are not, because their blood draining habits are quite different and much more bloodthirsty. It is said that to move around quickly the Baobhan Sith first take on the shape of a female wolf who wanders endlessly throughout the highlands looking for victims, who when they see a man walking (or hiking) alone, will instantly shape shift into a beautiful young woman but with cloven feet, which she will then hide from her unsuspecting prey by means of a long flowing gown. She will then approach her chosen victim by dancing seductively and elegantly towards him in an attempt to mesmerise him and knock him off his guard. But as soon as she gets within striking distance, she will start to attack him by lashing out in a frenzy with her long razor sharp fingernails until he falls to the ground paralysed by shock and where she will set upon him and strip him naked, as she begins slicing deeply and repeatedly into the skin all over his body and where she will start to lap at the fresh rivulets of blood as it oozes out of him for as long as she can keep his heart pumping and which then continues unabated until he is completely drained of blood many hours later. So if you are a man and you do wish to hike up to the top of Stac Polly on your own and outside of the main tourist season, then, well, I hope you have a really good day and if while you are up there concentrating on your shot and you just happen to hear the sound of a small rock falling off a ledge somewhere behind you and a shiver trickles slowly down the full length of your spine as the hairs on the back of your neck leap to attention and you think to yourself, oh come on man get a grip, it's nothing to worry about, it's just that Skye Photography bloke's web site that I once read and so it's just another one of his creepy ghost stories that he is using to try and freak me out, so I'll just ignor..... How to get there - Street View - Map View for the first viewpoint, can be reached by driving on from the waterfall location beside the A835 as described in the Little Garve chapter, then continue heading North along the A835 towards and then through Ullapool for another 30 miles or so until you arrive at the lay by viewpoint as linked to at the start of this sentence, for the first view of Stac Pollaidh shown in the centre of the multi frame pano shot, as shown in shot ONE above - and where I then used my multi shot stitched pano technique, as discussed in great detail throughout my book by the way. Then when you are finished taking your shots here, continue driving Northwards until you eventually arrive at a 'T' junction with the A837 and where you will then turn left on the A837 before continuing to head further North towards Lochinver and Durness for another 15 miles or so, until you finally pass the Ardvreck Castle Car Park as mentioned in the Ardvreck Castle chapter. Then keep on going past Ardvreck Castle for another 10 miles or so, until you come to come to turning to the right for Achmelvich, Clachtoll, Stoer and Drumbeg - Street View - Map View. Now continue up this road for 5 miles or so until you reach the Second view point for Stac Polly on your left, Street View - Map View and where I then setup my camera and tripod at the forward edge of the official car park near to the information board, to then take SHOT 2 as shown below. If you wish to walk to the top of Stac Polly, then turn around and retrace your steps all the way back down the A835 until you reach a junction with the A835 and the unnamed road to Achiltibuie - Street View - Map View - and continue up this road for quite a way until you arrive at the Stac Polly summit hike starting point car park - Street View - Map View. Or if you wish to read a much more detailed description of the hike up to the top of Stac Polly, then follow this Link to the Walk Highlands web site. |
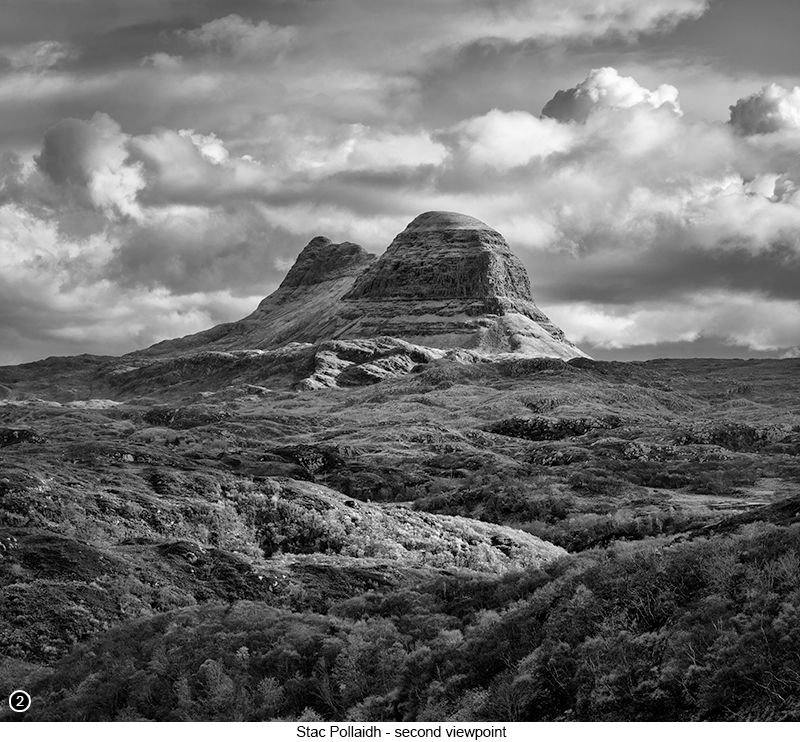 |
Tip: How to shoot square format images, when your camera doesn't allow you to shoot in square format? - as shown above in SHOT 2 Firstly, this is a very simple technique that I came up with for myself, to help me to both visualise and then frame up a 1:1 square format shot (as shown in shot TWO above), even though my camera (Sony A7R2) does not have the ability to either shoot or preview a shot in square format. So if your camera doesn't offer this square format facility either, then I think this is a quick trick that you just might find worthy of exploring and that will not only help you to frame up your square format shots better, but that will also help you to optimise the sharpness and depth of field (DoF) of your 1:1 shots at the same time - and the trick is? To rotate your camera into the portrait/vertical orientation by using the side slot of your ball head before taking your square format shots - OK, I am now imagining that you are sitting there looking at your computer screen with a blank look on your face, as you begin scratching your head and thinking 'so what's so clever about that Dave?' Well let me explain... Secondly, if you mainly shoot the majority of your shots using the normal 3:2 aspect ratio as most 35mm cameras are setup to use by default, then your 'eye' will probably have become very used to working in this 3:2 format and so very accustomed to visualising the world using a mentally generated 3:2 framing and there is absolutely nothing wrong with that, it happens and especially if you do a lot if photography shooting with a normal aspect ratio 35mm camera. But if you then want to try shooting in a 1:1 square format, which I think is a whole lot more difficult to both see and then capture successfully by the way, but more of that later, then your eye may not be able to visualise the shot quite so easily for 1:1 as it does for 3:2. But by rotating your camera into the portrait/vertical orientation position on your previously leveled tripod and then framing up the shot by using only the top two thirds of your view finder as your framing reference on three of its sides, can make the process of both seeing and then shooting a square format shot just that little bit easier and successful. So, having got your camera set up as just mentioned above, frame up your shot using the top and the sides of what you can see in the viewfinder, then when you are happy, rotate your camera up a little vertically so you are now using the centre of the lens, then open up a stop say from f/16 to f/11 to increase sharpness before rechecking your focus, then reset your exposure accordingly and take your shot. Thirdly, if I intend to use only part of the shot in the final composition, then the rules by which I would normally work out where to focus within 3:2 scene to optimise my DoF and hyperfocal distance point goes out of the window, because as you will probably already know that when we set our hyperfocal distance focal point, the DoF (or the extent of the apparent sharpness that we wish to capture throughout the scene), will extend from one third back from your chosen focus point and two thirds forward. So if I am only going to be using the part of the shot that is capturing elements within the scene that are further away from me and that no longer includes the foreground, then by default I am already using the larger two thirds part of the DoF (sharpness) from within the shot, which means I can then get away with using a slightly wider, sharper aperture such as f/11 for shooting 1:1, instead of perhaps using f/16 if I wanted to use the full 3:2 aspect ratio of the shot and still keep everything including the foreground in focus. This means I can then also use the centre of the scene as my hyperfocal distance point, rather than having to use a point one third up from the bottom of the scene for a shot where I intend to also include the foreground. So you know when I told you just a couple of paragraphs ago how easy this method was? Well it still is if all you want take away from this tip, is that I am suggesting that you rotate your camera into the portrait/vertical orientation before taking your square format shots, but not so easy to explain why this is a good idea I think, so I apologise for that, but none the less as you have read this far I will continue. Fourthly, if I want to shoot 'square' but frame up my shot using the 3:2 landscape/horizontal orientation and format, then other than the fact I will then feel compelled to use a stop or so deeper DoF for the hyperfocal reasons just explained above, I can also often find myself struggling to see where within the full 3:2 width of the shot I want to frame up the main subject within it, as there are then two side edges at either end of the left and right that I have to contend with and where I have to try to make up my mind where the shot will end at either side. Yet if I simply rotate the camera into the portrait/vertical orientation and use only the top two thirds of what I can see through the viewfinder to frame up my shot, then by default I will already have selected three of the edges and lined them up exactly where I want them to be and which then makes it much easier for me to ignore the fourth bottom edge. Then when everything is lined up as I want it to be, I can then rotate the lens up slightly so I am using the centre of the lens to maximise sharpness and detail, recheck my focus and exposure and take the shot to then crop off any unwanted pixels later. Fifthly, successful square 1:1 aspect ratio shots are not usually very easy to pull off, yet do seem to work much better if there is a lot of visually interesting details throughout the shot that then extends all the way into each of the four corners of the image, as shown in shot TWO above. Whereas wide aspect ratio landscape/horizontal shots and horizontal panos as shown in shot ONE above, do seem to be able to get away with areas of less interest within them, such as repeating areas without too much detail like the moorland grassy area shown in the foreground etc and yet still be considered as a reasonably good and interesting shot. Yet by simply placing my camera in the portrait/vertical orientation before attempting to shoot a much more difficult 1:1 aspect ratio shot, I can then more easily visualise what I am shooting and commit to what I think is the optimal framing, so that it will maximise the detail and interest within it. Now I'll bet you are probably thinking to yourself by now that wow, this guy gets a bit anally retentive when he is talking about what look like relatively simple 1:1 square format shots, but all I can tell you is this is how my mind works and is an idea that I came up with to allow me to really drill down into what I am choosing to shoot before I shoot it. So yeah, I suppose you would be correct in your assessment of me when it comes to landscape photography and that I do indeed get a little too anal in everything that I do. But then hopefully if when you look at my images you think to yourself something like 'I wish I had taken that'. Then all I can say is that I must be doing something correct and maybe by putting this much attention to detail into every single shot that I take (or make), really might just be the 'secret ingredient' that enables me to repeatedly acquire a level of quality within my work, that I am really very happy with. |
|
-- Exif information for each of the numbered shots shown throughout Part 2 of this chapter -- 1 - Canon EF70-200/2.8L IS USM, 1/100th Sec, 4 shot pano, f/11, ISO 100, Focal Length 125mm, taken on 18th Oct at 09:45 |
If you have enjoyed reading these 'Extra' chapters to my Guide Book and think you might also enjoy reading 79 more chapters across 270 pages, that also includes more than 340 Fine Art quality images, along with detailed descriptions and large scale maps to guide you to the exact location of where I took each and every one of them and which then goes onto discuss the techniques and tools I used to process them, but where everything is written in plain easy to understand English? Then please consider buying the Book. |
|