The Fairy Bridge of Glen Creran (from Glen Coe) |
Tip: You will have probably travelled all the way up to this area of Scotland, just to photograph in and around Glen Coe. Because that is where all the more obvious and well known photographic hotspots can be found. But what do you do, if when you finally get here, you find that the weather is doing the exact opposite of what the forecast said it would. So there is nothing you can shoot, at least in that way that you wanted to. So you begin to feel disappointed and how your journey has been wasted and all for nought? Well what if told you, there is another amazing location nearby, that you probably haven't heard of and that looks fantastic in all types of weather, and at all times of the year. And, it's only a thirty minute drive away. Would you be interested in taking a look? Of course you would..! But first, as I am assuming you are already driving through Glen Coe looking for shots. Then here is another location you might not be aware of, near to the bottom of Glen Coe, called the Clachaig Falls. Even though these beautiful falls, as shown in SHOT 1 to the right, are just a few yards away from the main A82 road. So continue driving down Glen Coe, heading towards Fort William, until you pass loch Achriochtan on your left, with its large car parking area also on the left and park in here, Street View, Map View, Street View. |
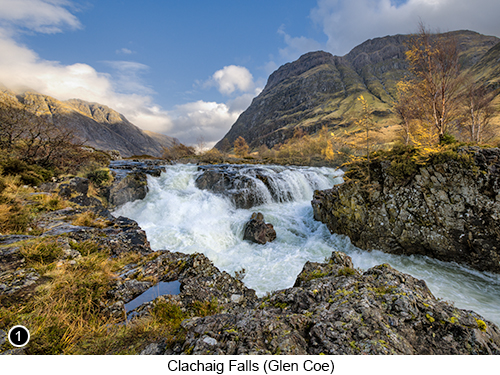 |
If you then walk out of the bottom of the car park and cross over the A82 (watch out for fast moving traffic), onto the other side of the road. Where a sign is pointing towards the Visitor Attractions, Street View. And continue walking for a couple of hundred yards further. Until you come to a great view of the Clachaig Falls now on your left, that most people drive past, as they continue on down the A82 heading for Fort William, Street View, Map View. You will then see, a short, grassy path on your left, that leads down to the edge of the falls and a fantastic view back up Glen Coe, as shown above, Street View. So make your way down this path and head towards the edge of the river and the falls to your front left and setup your tripod there. But take care down here next to the falls, as the rocks surfaces always seem to be wet and very, very slippery. ...now back to the main subject of this chapter, which is the Fairy Bridge of Glen Creran, as shown below. |
|
 |
|
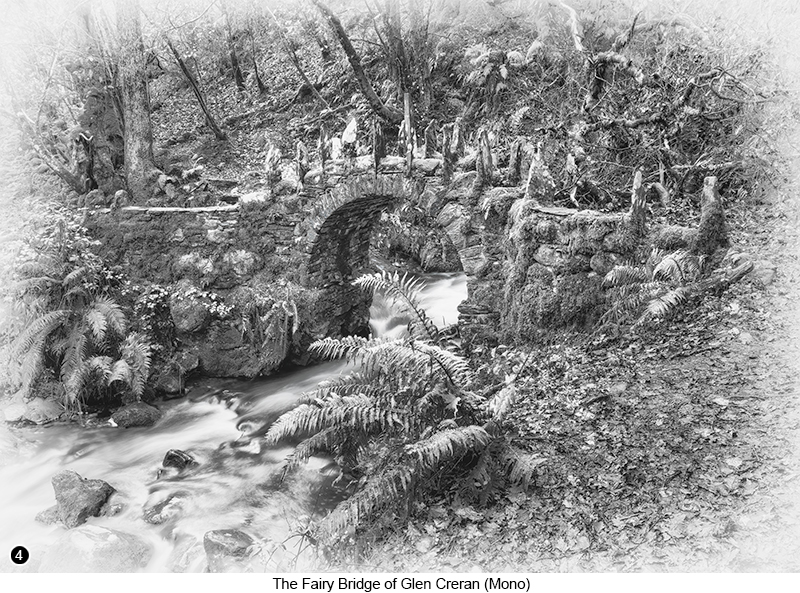
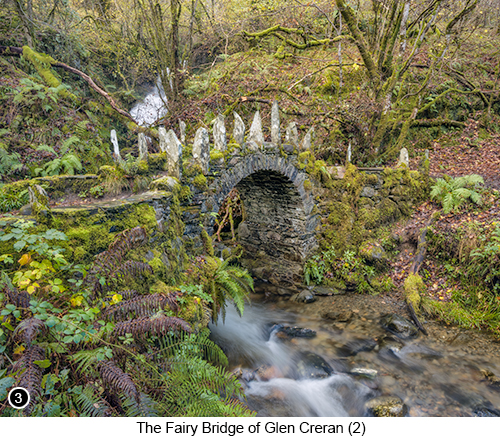
It is said in ancient Scottish folklore, that the Fairy Bridge of Glen Creran, is a gateway between two different worlds. The human world and the mystical world of the fairies. Where very occasionally, the two can interact and trade wishes for gifts. In fact it is said to be unlucky, for anyone to walk over the Fairy Bridge of Glen Creran, without offering a small gift to the fairies, to avert their displeasure. But for which, they will then grant you a single wish. |
|
 |
|
This short photographic journey, I am now going to take you along, as part of my ongoing series of "Free Photographer's guides to Scotland". Is only a relatively short one, when compared to most of the other photography guides you will find on this site. But I think it is a particularly good one. That takes you deep into an old, untouched remnant, of the ancient Caledonian forest. Then to a mystical, hidden away gem of a location, that I know you are really going to want to spend several hours photographing, as well as enjoying the enchanting atmosphere, that surrounds the Fairy Bridge. The walk up to the Fairy Bridge from the nearby single track road, takes around fifteen minutes, as you make your way up along a muddy path, through the mixed woodland of the Coille Mheadonach forest. Where the path in a couple of places, does become quite steep, but nothing too strenuous and for which I would also advise, you put on your wellies, before heading off up this short hike. Because after heavy rainfall - which you want, so there is plenty of water flowing under the bridge - the mud can become quite deep. In fact deep enough in parts, to rise well above you ankles. Then when you do get up to the bridge, you will probably want to wander around within the burn itself with your wellies on, as you search for the best vantage points, to shoot the "Fairy Bridge" and the surrounding forest. As shown here in SHOTS 2, 3 and 4. How to get there: From Glen Coe, drive down through the glen on the A82. all the way to the bottom, as you head towards the town of Fort William. Until you eventually come to a roundabout, that is signposted to Oban, Street View, Map View. So take the route heading towards the town of Oban, by driving around the traffic island and then down onto the A828. You will then continue driving towards Oban for the next 19 miles, until you come to another traffic roundabout, where the A828 heads off to your right and with Invercreran (Glen Creran) straight ahead. |
 |
So drive on straight ahead, as you follow the sign pointing you towards the Glasdrum Wood - NNR. Street View, Street View 2, Map View. Then continue driving up this unnamed, single track road, for another couple of miles or so, until you reach a passing place on your left, near to a couple of houses, Street View, Map View. Where you will then see a sign, telling you that this is not a parking place but just a passing place and that the actual parking place, is a half mile further on. You will also find at the far end of the passing place, there is a not-so-easy-to-see muddy path, Path View Location, that leads up into the woods. Which is the path you are going to take up to the Fairy Bridge, after walking back down from the official car park. So please do not park in this "Passing Place", as you can cause untold traffic problems for the locals, who need this space to be able to pass each other, when approaching in opposite directions. And, you could also receive a hefty fine from the local traffic cop for doing so, as it is illegal to block off any passing places in Scotland. Now if you are an old photographer like me, who also happens to have a very understanding partner. Then get them to drop you off here, while they go and park the vehicle a little further up the road - Street View of the official Fairy Bridge Car Park. |
|
|
|
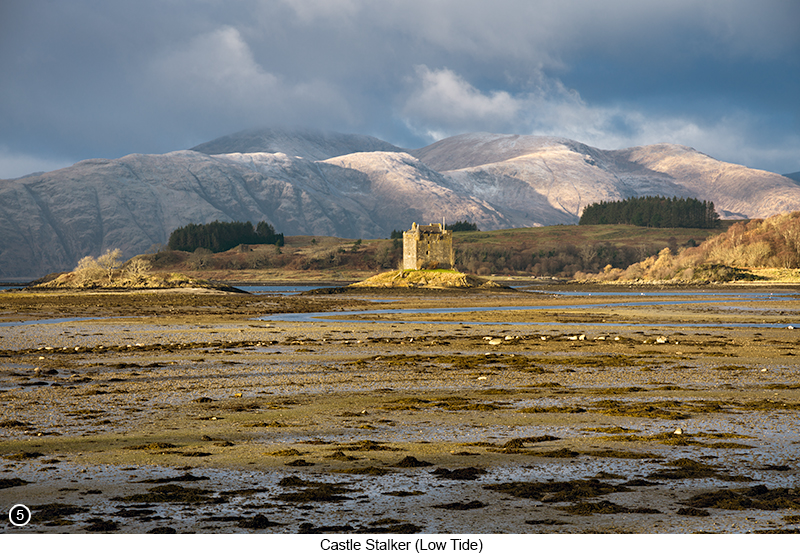
Then, having made you way up to the Fairy Bridge and grinning from ear to ear as you first get a glimpse of it - because it is just so cute and photogenic. You will then see, there are a very limited number of compositional views you can shoot it from. Which are mainly to the left front of the bridge, the right front of the bridge, or standing in the burn looking up towards the bridge. Which as you can see from the three SHOTS I am showing you above, I only got to shoot it from the left and right sides. This being due to the fact, that when we were there, it was straight after several days of high wind, heavy rain and hail storms. So there was far too much wood, twig and branch debris, cluttering up the lower part of the burn, to make it worthwhile. Which meant the view up from the burn, while not being totally obscured, just had way too many unsightly twigs and branches sticking into the frame from all sides, to allow me to get a clean shot of it. So I simply stuck to what shots I could get and very happy I am with them too. Then when you have finished photographing the fairy bridge, return to your vehicle and head back the way you came in, to rejoin the A828 heading back towards Fort William and Glen Coe, until you reach the village of Appin about 7 miles further on. Where you will then see a road sign on your left, for a left turn onto Port Appin and the Lismore Ferry, Street View, Map View. Turn left here and drive for about a mile and a half along the single track Tyneribbie Road, until you reach the Millennium Bridge Car Park. With a fantastic view of Castle Stalker across the bay, as shown here in SHOT 5 below. |
|
|
|
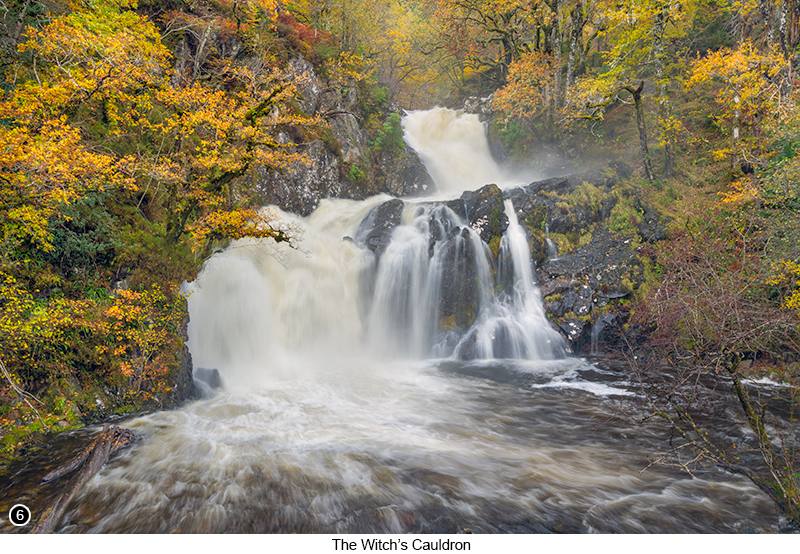
If you want to get closer to the castle, then you can do so by walking across the Millennium Bridge, that crosses the bay to your right. Then turning left to follow an old rail track and then further on down the beach next to the castle - but I am not going to cover this location any further, as this area is discussed in much more detail within my Photographers Guide, to the Isle of Skye and the North West of Scotland Then, on our way home back to the Isle of Skye, we took a short detour to another amazing location, called the "Witch's Cauldron". Which due to the amount of rain we'd had over the previous week, was absolutely raging and looking like I had never seen it before, as shown in SHOT 6 below. But, as I have already covered the Witch's Cauldron waterfall in a previous free chapter guide, as well as several other great photo locations very close to it. I thought it would be better, if I just put a link to that chapter HERE. Where you can then go to read about this location (as well as several others near to it) in much more detail. |
|
 |
|
Exif information for each of the numbered shots shown throughout this chapter --1 - Canon EF16-35/2.8L USM, 1/30th Sec (+/- 2 stop bracket), f/11, ISO 250, Focal Length 16mm, taken on 1st Nov at 13:32 --3 - Canon EF16-35/2.8L USM, 2 Sec, f/16, ISO 100, Focal Length 24mm, taken on 1st Nov at 14:54 --4 - Canon EF16-35/2.8L USM, 1.3 Sec, f/11, ISO 160, Focal Length 24mm, taken on 1st Nov at 14:57 --5 - Sigma 24-105mm F4 DG OS HSM | Art, 1/200 Sec, f/8, ISO 250, Focal Length 85mm, taken on 1st Nov at 15:28 --6 - Canon EF16-35/2.8L USM, 1/3rd Sec, f/11 (with 3 stop ND), ISO 100, Focal Length 32mm, taken on 2nd Nov at 12:40 |
|
If you have enjoyed reading these 'Extra' chapters to my Guide Book and think you might also enjoy reading 79 more chapters across 270 pages, that also includes more than 340 Fine Art quality images, along with detailed descriptions and large scale maps to guide you to the exact location of where I took each and every one of them and which then goes onto discuss the techniques and tools I used to process them, but where everything is written in plain easy to understand English? Then please consider buying the Book. |
|