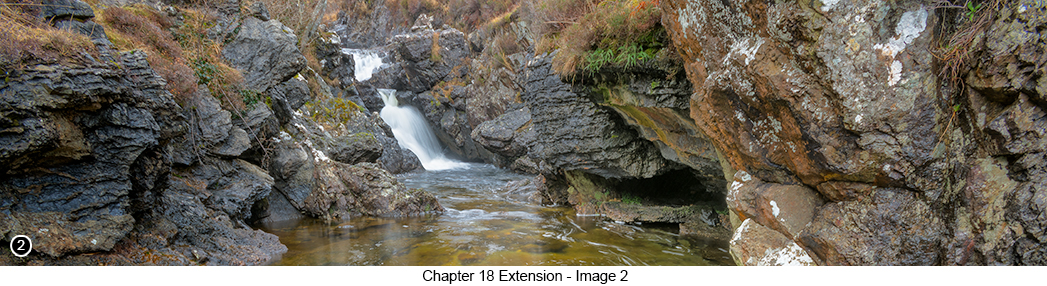
A hidden away series of waterfalls and cascades on Skye, like a miniature version of the world famous 'Fairy Pools' |
So I suppose the first thing I need to do is to explain to you, why the heck this 'Chapter 18 Extension' text and location description, does not appear in my photographers's guide book? Well it's simply because I repeatedly kept failing to get any worthwhile images of this location. Yes I tried at least a couple of dozen times over the decade or so that I have lived on Skye, but for whatever reason, I just couldn't produce anything that I thought was worthwhile and that I wanted to show you. You see this location is not an easy one to photograph and when I say it isn't easy, I don't mean that it's physically difficult to get to because it isn't, in fact it is the very opposite and only a 2 minute walk away from your vehicle, but photographically and compositionally, I found it to be a challenge that I just couldn't get my head around, so I had given up on it. But then Covid came along and like everyone else, I was limited to where I could go to with my camera and still remain within the law, which meant that this location became the only one I could legitimately visit regularly and even then for no more than one hour per day. So even though this waterfall had turned into a sort of photographic nemesis for me over the years, whereby no matter how often I visited it, or however I chose to shoot it, I always came away with a memory card full of disappointments. But then due to the lockdown and the fact that this became the only scenic location I could legally visit, I decided to throw myself back into the challenge and once again try to capture something that I considered to be worthwhile and slowly over time, my newly re ignited determination to get something, anything, began to morph what I once thought of as my photographic nemesis, into whatever the word is that means the opposite of nemesis - savior perhaps??? Although I think the word savior might be too strong a word to use here and sound like I am trying to say, how this location helped to save the very essence of my soul or something, during a very traumatic period in all our lives. But anyhow, I can't really think of any other word to use at the moment, so without any further ado, why don't I just show you the results and let you make up your own mind? |
|
|
|
OK, so I could now waffle on at length about the moral of this tale and how you should never give up on a location and just grit your teeth and keep on pushing forward, no matter what your prospects of success are. But there comes a time when the amount of effort needed to continue trying, begins to out way the amount of pleasure you are getting out of it, as well as being willing to continue knocking huge chunks out of your ego for no good reason. Then it is times like these that we need to get out of that particular rut and take stock of what we are doing and remind ourselves, that we are supposedly doing this because we love it and not because we have a fear of failure. So what I would suggest you do if you find yourself in a situation like this, is when you are repeatedly struggling with your own nemesis location (because we all have at least one in our lives don't we?) and keep failing miserably every time you go there, even if you are sure it has the potential to yield some really good images, but that has now morphed into your nemesis, then move on and go somewhere else and be willing to admit defeat. But then when you do have a few more successes under your belt at other locations and sufficient time has passed to allow you to get back your mojo, then by all means go back and give it another try, but try not to beat yourself up if you fail yet again. Because one day you will go there and something fundamental will have changed and everything will just seem to drop into place, like it never has done before. Or you could of course do what I did to overcome my nemesis and wait for a global pandemic to hit and watch as everyone in the media began running around like headless chickens and telling us how we could all be wiped out in a matter of weeks - now that really did make me see the world differently and laser focus my attention and is how I came to defeat my photographic nemesis. But perhaps that might be a little too drastic for us all to go through again just for a few photographs, but hey it certainly worked for me... |
|
 |
|
| - | |
 |
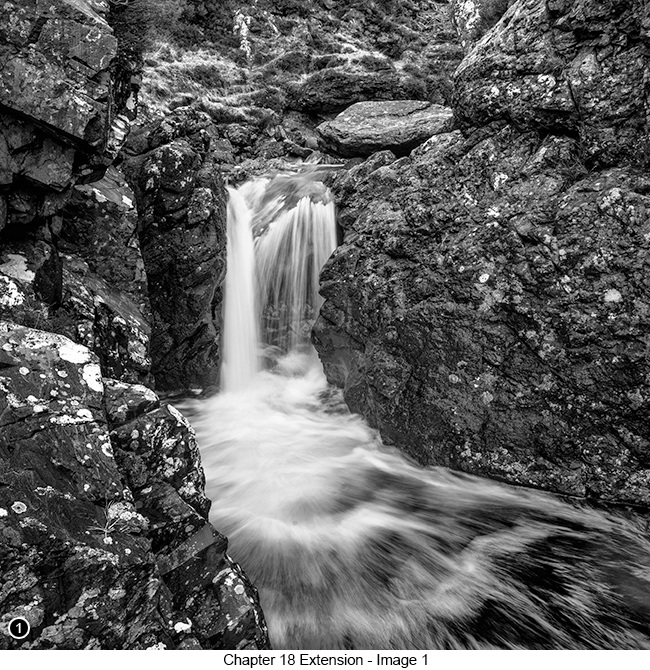
How to get there - On the bottom left of page 59 in my Guide Book, I begin to describe where I parked for most of the images that I show you and discuss throughout chapter 18. So assuming you have a copy of my book in your hands and you are now parked where I suggested for this location, if you turn around and look back up the hill behind you, you will see a couple of low lying round topped peaks in the middle distance and immediately to your right, a small river with a seam of marble running across the bottom of it. Walk over to the river and then follow its left bank around to your left, until you see a small ill defined path leading down towards the edge of the river, just past a right angle bend in the river. You will now hear the waterfall nearby, but as yet still not be able to fully see it. Scramble down the bank to the small pebbly foreshore area next to the river and look for a large boulder that sits in the edge of the river directly in front of you. If you now climb on top of the lower part of the boulder, you will see the scene as shown in SHOT 1 at the top of this page. But you have to be careful here, as the pool of water you are now standing directly to the side of, is very deep indeed, even though the river is only a few feet wide at this point. Because the water running through here has been doing so for millions of years and so has had more than enough time to wear out a deep vertically sided pool, that is very similar to what you will find at the much more well known location of the Fairy Pools (covered in Chapter 28, page 89 of my guide). So having now worked this area of the falls with your wide angle lens and hopefully without falling in to the deep pool, if you climb back down from the rock and look around to the left hand side of it, you will see there is a small slippery slope, that leads up to a gap between the gorge wall on your left and another higher part of the boulder on your right. Walk up through the gap and then around to the front side of the main piece of rock now to your right, for the scene looking further up the river to a second waterfall, as shown in SHOT 2 above. Now even though the above shot makes this scene look quite large and wide, it isn't, in fact it is quite cramped in here and with only enough room for a couple of photographers to work comfortably. So I find it is best to shoot this scene using a wide angle zoom lens and one that can go out to at least 16mm if possible. In fact all the shots I am showing you throughout this chapter 18 extension, have been taken with my 16-35 wide angle zoom. If you would like to get closer into the falls as shown in the centre of SHOT 2 above, then you will have to paddle/wade your way closer into the scene. But be aware of how slippery the river bed is here and don't do anything silly, because if you are here on your own and you slip, then no one will find you quickly and your phone will probably not be able to locate a signal and yes I know, it is so easy to get into the 'Photographers' mindset of thinking "I'm only a few yards away from the road, so what could possibly go wrong?" But please don't, because while you are in here and in fact any other part of these fairy pool like gorges, you will be totally on your own and no one other than the occasional passing landscape photographer, who also happens to have read my book, is likely to ever think of looking in here. And besides that, the next time I go in here for a happy hour of photography, I don't want to be slipping through a puddle of decomposing goo, or tripping over a pile of bleached bones, now do I? |
OK, I am obviously joking in the previous statement, but even so this is still a very serious subject and I do worry that one of you might go to somewhere I am describing and something unforeseen happens to you. So yes I am being unnecessarily flippant, but at the same time I am also being deadly serious about the message I am trying to get across to you and that is, don't take any risks, do tell someone where you are going and when you expect to return and do no not rely solely on your phone to get you out a sticky situation, because it probably will not work. Now if you turn to your right without moving your tripod, you will see the scene as shown in SHOT 3 above, which shows you the tight squeeze that the river goes through to exit this small gorge, as well as showing you where I was standing to take SHOT 2 and how small and narrow this location actually is. |
|
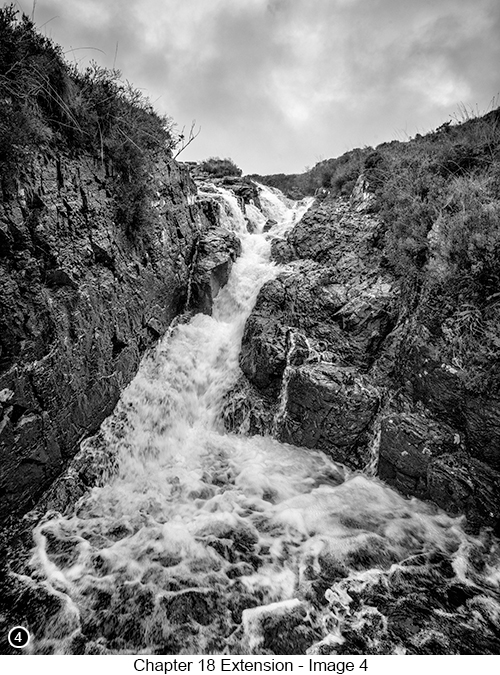
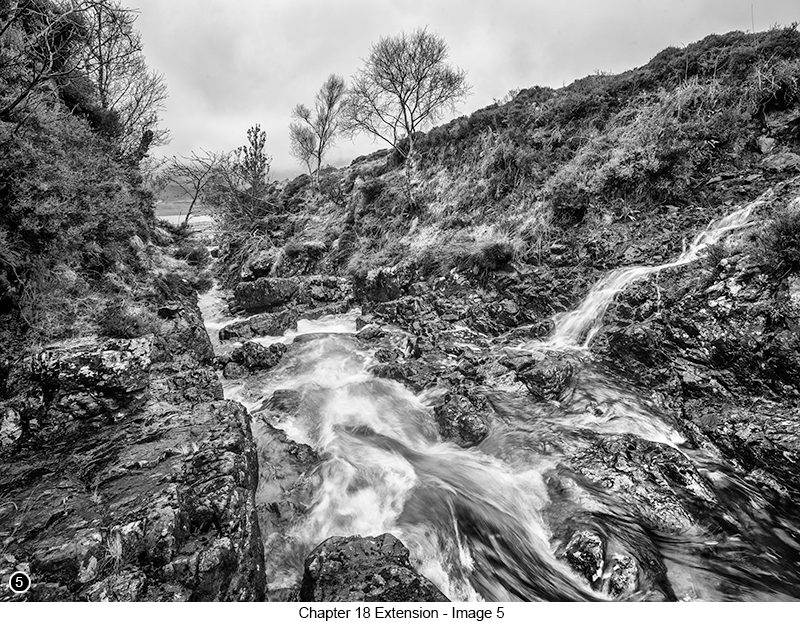
So moving on further up the falls - you can of course continue walking up the left hand side of the river and scout around the many other photo opportunities you will find up there and which is definitely something you should do. But I find that the more productive compositions are to be found up the right hand side of the falls. So after scouting out the left side, work your way back down to where you are parked and then walk over the flat concrete bridge to the left hand side of the river and then follow its bank for a couple of hundred yards up the hill, until you come to a narrower and more steep sided part of the gorge. You will then see an area to your left, where the bank down to the river is a little less steep and another ill defined path leading down the grassy bank to the edge of the river and another small, pebble covered rocky area, that sits directly in front of a second deep pool, with just enough room to setup your tripod to work from and is where I took SHOT 4 shown on the right. This really is a glorious little hidden away part of the falls, that not many people have photographed and is always worth exploring, but especially after a good long downpour. In fact all the series of falls and cascades I am showing you throughoout this chapter extension, look good after heavy rain. Now having taken your shots of the upper part of this area of the falls, if you turn around 180 degrees to face back down the falls, you will see the scene as shown in SHOT 5 below and which also shows you how the falls continue on down the hillside, to then feed directly into the loch below. Here is a quick tip for these falls - because this gorge is steep sided and quite deep in places and the light levels you will be working with, are always going to be problematic. So the best time I find to be here, is when it is a bright/overcast day, where there is a thin layer of cloud, but where the cloud is still thick enough to stop any harsh light getting through, yet thin enough to let plenty of good quality light through it to bounce around and into the shadows. Now I could write a whole book about the quality of light and probably so could you, but briefly and using a completely unscientific set of analogies, to explain what it is that I am trying to say, is that if you imagine light (or at least the photons of light being a physical particle, which it sort of is) as droplets of paint being sprayed from can. If you only press the button on top of the can slightly, so that it only allows out a small amount of spray, then even though the droplets of paint (photons) will all be around the same size as if you pressed down the button fully, there will be fewer of them and so they will struggle to cover a surface. Then if you hold down the button fully, the droplets will still come out at the same size, but there will be lots of them and so can more easily and quickly cover a surface in one go and even begin to drip if you hold down the button too long (overexposure?). Now if you held up a perforated card in front of the spray and pressed the button down fully once again, then only the paint that can get through the perforations will pass through, before they then become diffused in a thinner layer across the surface. And this is how I think off light and the quality of light. So when there is thick cloud and the sun is getting towards the horizon on an overcast day, then this would be bad light at this location, because there will only be a few photons that are able to get through and then bounce around the scene in front of you (a bit like half pressing the spray can button you could say). So any shots taken under these lighting conditions will tend to have a lot of noisy gaps between the photons, as there just isn't enough of them getting through. However, if it is an overcast day, but where the clouds have a consistent but shallow enough thickness, that doesn't blot out the light completely and where the sun is still relatively high in the sky, so allowing lots of photons to pass directly through the clouds. Then I would consider this to be good light for this location and is exactly what it was like, when I took SHOTS 1 to 5 from within this gorge. |
And of course there is the cloudless day with high midday sun harshness, where everything is bathed in a thick coat of photons and which will produce very contrasty light and which is definitely not what you want at this location. So when I say the best light for these falls is bright/overcast light, then this is my ham fisted explanation, of what it is that I am trying to say. Ok, so so we are already 5 shots into this chapter 18 extension and we are still probably only around a quarter of a mile from your vehicle, but wait there's more.. |
|
|
|
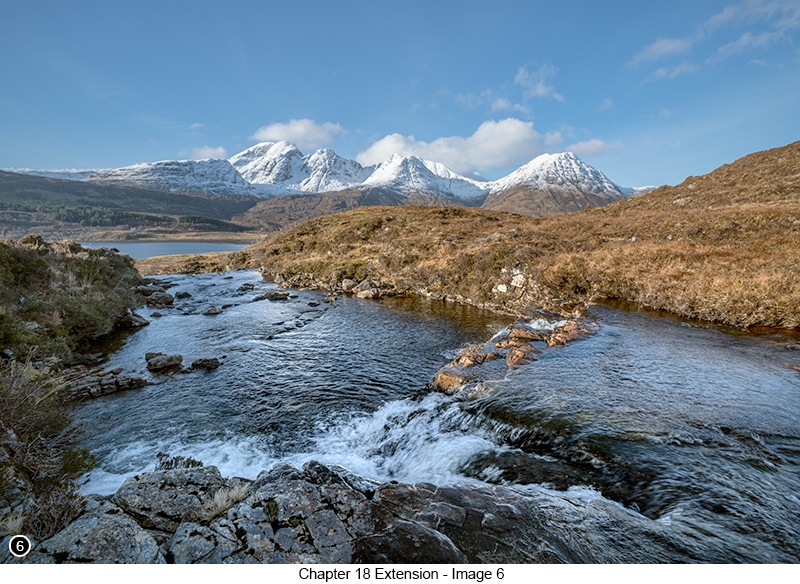
If you now continue walking up the hill as you follow alongside the river to your left and then on passed yet another wide cascade, you will soon come to an area where the land flattens out and where a really good view opens up across the glen behind you, to a line of snow capped peaks in the distance, as shown here in Shot 6 below. Then look for a flat area of rock the runs alongside the right hand side of the river for about 10 foot and which is the ideal place to setup your kit and shoot from. But however good you think this location looks form this image and how easy it will be to shoot, there are a few annoying and very distracting obstacles you will have to work around at this viewpoint and these are several lines of ugly fence posts that run down the right of the shot. So once you find your composition from the flat area of rock, you will then need to get down as low as you can, so that you can hide the fence posts behind the small hill that runs along the right foreground of this shot. Fence post can sometimes be incorporated into your work successfully and can be really useful as lead-in lines, as they point towards the main object within your shot. But these fence posts are new and not very pretty pieces of light coloured 2x2 wood, which to my eye don't add anything of value to the shot and in fact are a complete distraction. But they can be easily made to disappear, by getting down as low as you can next to the river and which is exactly what I did did for the shot shown below. |
|
 |
|
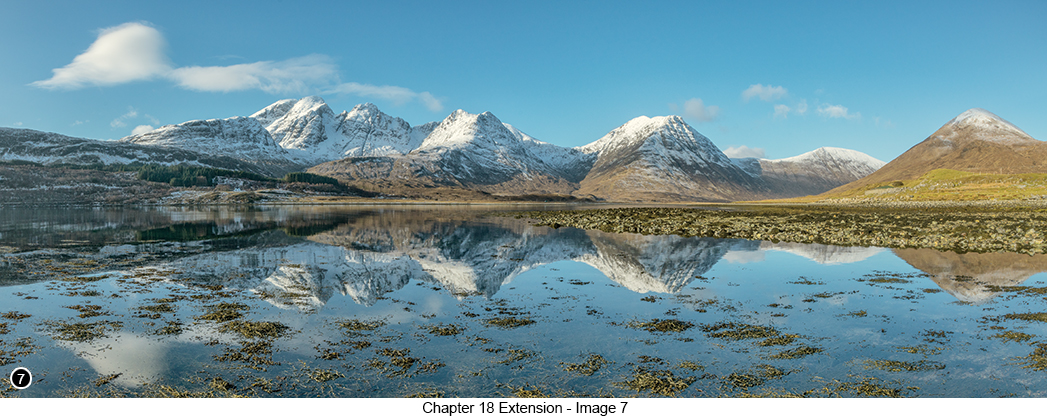
So having worked these falls from both the left and the right side of the river, if you now retrace your steps all the way back down to your vehicle and then cross the road to the left of the concrete bridge, before continuing to follow the river until reaches the edge of the loch, where you will then see the view as shown in SHOT 7 below. |
|
 |
|
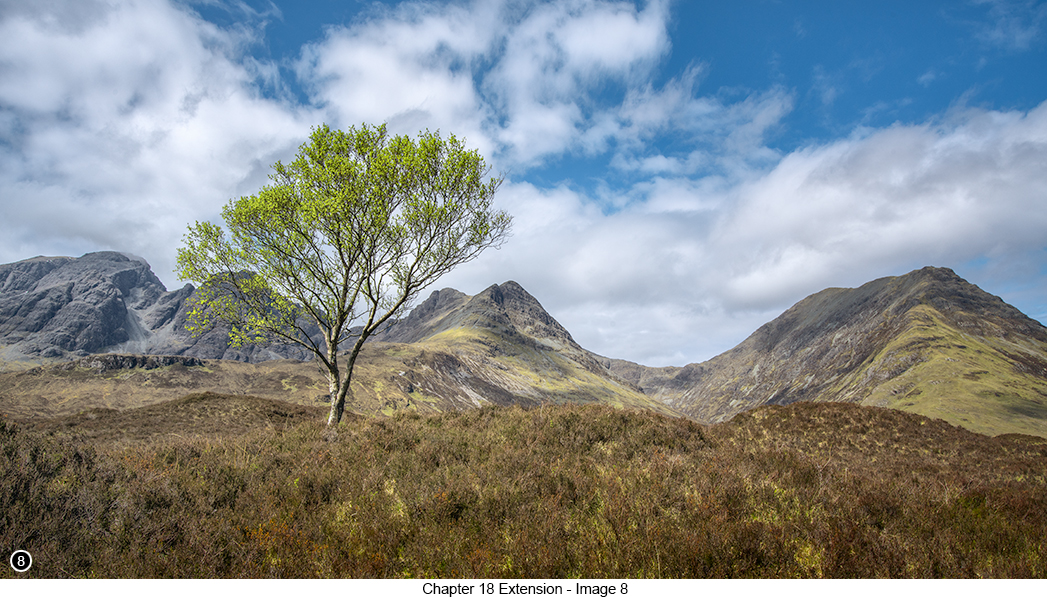
Tip: I would suggest that you should allow yourself at least three hours to fully work through all the scenes I have shown you above and as I said at the beginning of this text, don't beat yourself up if you do not come away with anything worthwhile at your first visit, as it really is quite a difficult location to shoot - believe me, because I have just spent the last ten years coming back to the upper part of these falls and failing miserably every time. So if you are confident in your photographic abilities, but you would also like to give your creativity a good 3 or 4 hour workout, then this series of falls is a really good place to do that, as they really are quite a challenge to shoot successfully. And there is also the added bonus at all the viewpoints described in this chapter 18 extension, is that you will be able to fully concentrate on what you are doing and hear yourself think, as you work through each scene one by one, because other than the sound of the cool clear water, as it runs off the mountains around you and then bubbles its way over these ancient rocks and out into the loch below, you can fully expect to have the whole of this amazingly tranquil place, completely to yourself - enjoy! Oh and as a bonus shot that you might also find interesting from this area of Skye, if you now drive to the opposite side of the loch and just before you drive over yet another small flat concrete bridge, you will see a path that leads up the hillside to your right and where about 50 yards up from the road, you will find the view as shown below in SHOT 8. |
|
|
|
--Exif information for each of the numbered shots shown throughout this chapter --1 - Canon EF16-35 f/2.8L USM, 1/4 Sec, f/18, ISO 100, Focal Length 22mm, taken on 8th Mar at 12:53 --3 - Canon EF16-35 f/2.8L USM, 1/4 Sec, f/18, ISO 100, Focal Length 16mm, taken on 8th Mar at 13:23 --4 - Canon EF16-35 f/2.8L USM, 1/80th Sec (2 shot vertical pano, with -/+ 2 shot brackets), f/16, ISO 100, Focal Length 16mm, taken on 27th Feb at 11:47 --5 - Canon EF16-35 f/2.8L USM, 1/8th Sec, f/16, ISO 100, Focal Length 16mm, taken on 27th Feb at 11:25 --6 - Canon EF16-35 f/2.8L USM, 1/60th Sec, f/16, ISO 100, Focal Length 16mm, taken on 30th Jan at 12:10 --8 - Canon EF16-35 f/2.8L USM, 1/200 Sec, f/16, ISO 200, Focal Length 25mm (cropped), taken on 1st May at 11:28 |
|
If you have enjoyed reading these 'Extra' chapters to my Guide Book and think you might also enjoy reading 79 more chapters across 270 pages, that also includes more than 340 Fine Art quality images, along with detailed descriptions and large scale maps to guide you to the exact location of where I took each and every one of them and which then goes onto discuss the techniques and tools I used to process them, but where everything is written in plain easy to understand English? Then please consider buying the Book. |
|