Allt na Subh and Shooting into the Light (Contre Jour) |
|
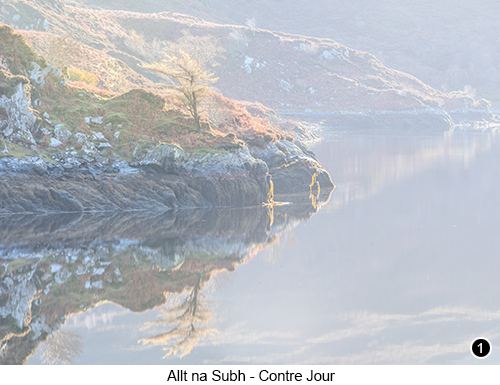
Shooting into the light - Shooting directly into the light and especially the type of very strong light I am going to describe here for the first two images in this chapter and that we want for this particular 'Contra Jour' technique to work effectively, is going to be difficult, very difficult. In fact I would even go as far as to say it is probably the most difficult type of lighting situation that you will ever encounter as a landscape photographer. But that being said, it really is worth taking the time to try and master shooting under these lighting conditions when you see them, because it really can get you something that looks very different to what everyone else is doing, as well as all the other images in your portfolio and when I say different, I mean in a good way. So let's get straight into it - SHOT 1 shown here on the left, is an image that shows you exactly what the 'Contra Jour' effect is that I am trying to describe, whereby on the cooler shorter days of the year, when the sun in Scotland during the day stays quite low on the horizon, but can also be so strong when shining directly into your face and the lens of your camera, that it can even appear to be lighting up all the dust particles floating around in the atmosphere, so that the very air itself seems to be glowing. I am sure you will know the type of light I mean, because I'm sure you must have experienced it on a bright cold morning, where there wasn't a cloud on the horizon and where everything you looked at that was being lit by the direct glare of the sun seemed to sparkle? Yes, that's the type of harsh directional light I am talking about. So to get an image under these very harsh lighting conditions, that doesn't also include horrendous image ruining lens flare would seem to be impossible, but, as you can see here on the left and below it isn't impossible, difficult yes, in fact very difficult, but not completely impossible if you put your mind to it - so here's how I did it. |
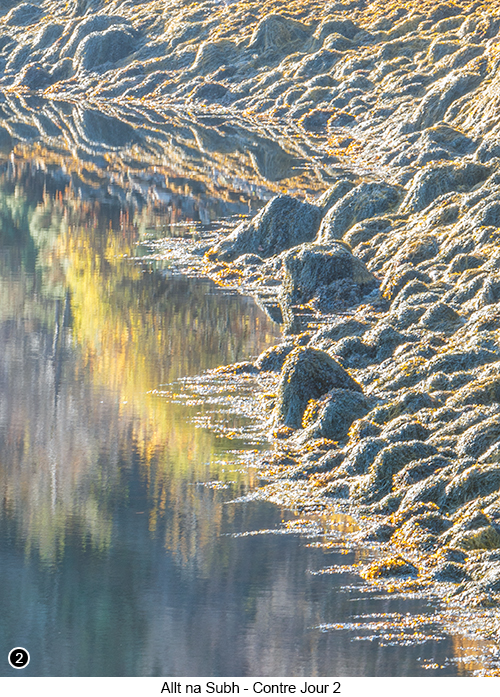
It was a very still morning and I was driving around looking for shots as usual and sort of meandering my way down towards Eilean Donan Castle, when I thought I would take a quick detour down Loch Long before going onto the Castle, which sits on the outflow of Loch Long. Now Loch Long is a beautiful but hidden away location (covered in detail in my book by the way in chapter 49) that sort of hides around the back of the Eilean Donan Castle area and where most visitors to the area are totally unaware of, as they hurry on past the castle after photographing it, to get onto the Isle of Skye just a few miles further on up the main A87 road. So it always seems to be quiet here and because this loch is also surrounded on three sides by the walls of a steep sided glen, I have learnt over the years that it can often be reflective as well, even when it is quite windy outside of the glen. Then having driven a couple of miles into the glen and finding somewhere to park that didn't block off the road (as discussed in the How to get there section below), I started to look for a subject that I could work with and that emphasised the harsh light pouring into the glen, when I spotted this small lonely tree and its reflection by the edge of the loch, as shown in SHOT 1 above. Now a lone tree sitting above seaweed covered rocks with an almost perfect reflection, is probably about as juicy as it was going to get for me? But how could I control the harshness of the light that I knew would be shining directly down the barrel of my lens? So I set up my gear and using a 70/200 lens with its long lens hood mounted, as I started to frame up the shot and compose it how I wanted it to be. But I quickly found that even if I used my hand held out in front of the camera, to try and shield against the sunlight coming into my lens, that the light was so near to being directly in front of me, that I still couldn't stop it flaring across the front element of my lens and ruining the shot. But then it dawned on me that if I used my head (and I do mean quite literally that I was using my head to block out the sun), I found that by using my cable release and then walking out as far as I could, to stand towards the front right of my camera, that if I then leaned just my head into the shot, until the sharply defined shadow of my head covered the entire front element of my lens, as well as the thin but slightly reflective plastic filter mounting ring that sits around the front edge of it, so that I could then get a shot without flare. So why was this such a revelation to me? Well, now that I have described to you what I did, it sort of seems obvious doesn't it? But until I took these particular shots shown here and for all the other shots I had taken previously in this 'Contre Jour' style, I would always try to use my hand or my hat held in front of the lens as I looked through the viewfinder, to try and judge whether I could eliminate the flare. Which meant I often then took a shot with either my wavering hand or hat showing in the shot, or I would get lens flare. So by using my head as a lens flare filter, after realising that I would never be carrying anything with me, that was ever going to be more solid or thicker than my head (hey, stop tittering at the back there) so why not use it. So by using my head as I looked at the front element of the lens, I could then watch its shadow as I began to lean it in gradually, until I had placed its solid edged shadow at the exact point to within a millimetre of where it needed to be, to totally block out the flare before taking my shot. I then rotated my camera slightly to the right as I moved to the left of it and using my head once again, I took SHOT 2. |
 |
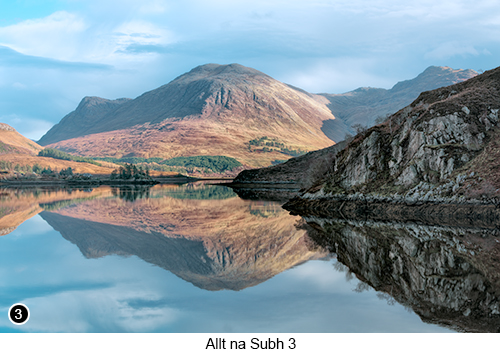 |
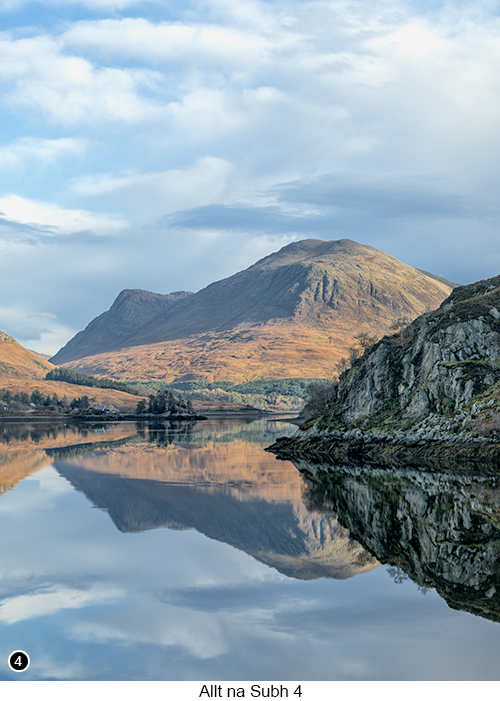
This meant I was able to capture a couple of shots that I would not normally have been able to acquire successfully using either my hand or my hat, simply because I would not have been able to block out the sun with the amount of precision I needed, which for SHOT 1 was quite literally no more than a couple of millimetres away, from shining directly down the barrel of my lens and ruining my shot with uncontrolled flare. Then after taking these two shots, I started to walk back down the road the way I had driven into the glen, looking for a large enough gap in the trees that would allow me to take a shot or two down the loch. But there really aren't many gaps in the trees at this point along this part of the road into the glen, except for where there is a three foot high stone wall next to the road, where I found if I clambered onto the top of it, I could set up (precariously) to shoot a fairly uncluttered view of the scene. But even then I still couldn't add in as much of the sky and reflection as I wanted to without the branches poking into the sides of the shot. So I had to zoom in further than I wanted to, as I also tried to keep the shot as balanced as possible and with as much sky and reflection as I could for SHOT 3. However even then I still wasn't able to frame out all of the branch tips showing in the bottom left edge of the shot, but which I knew I could clone out later using Content Aware Fill in Photoshop, which I did. I then rotated my camera into the vertical/portrait orientation, because I was determined to get at least one shot that showed how beautiful the sky was. I then grabbed a short three shot vertical pano, as shown in the SHOT 4 below. |
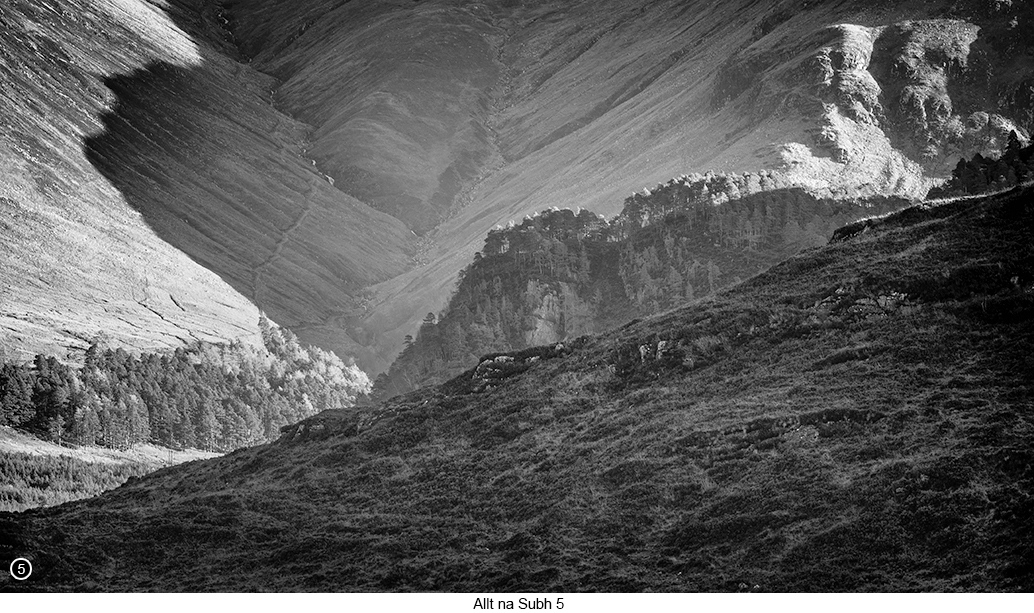
So there I was with a satisfied smile on my face and wondering what I could shoot next, because once you get into the zone, you just don't want it stop do you? So to change gear a little, I threw on my 1.4x extender in addition to my 70/200 and began scanning around the hills as I looked through the viewfinder, to see what else I could find if I reached out to 280mm. Now this 'changing gear' idea is a really good thing to do, because once you have fully worked a scene with one lens and to the point where you know you have captured all the obvious shots, then instead of wasting time and card space and just shooting the same scene over and over again, because it's so good you are struggling to let go of it, then that is the time to try something different. Because if the light and the landscape in front of you really has been that good for all those obvious shots, then it should be good for many other types of shots as well and that you may not have been able to see yet, because of all those obvious good shots getting in your way and that is how I came to take SHOT 5 shown below. Now I don't really know why I like SHOT 5 as much as I do, but I do, in fact so much so that when I look at it now, it makes me realise how I have finally reached a point with my landscape photography, where I am able to repeatedly create images like this, which seem to be more about letting my 'muscle memory' take over and select what I should shoot and how I should shoot it, rather than they are about how I have used the more analytical parts of my brain to find compositions. So I suppose why I really like SHOT 5, is because it feels like it is more representative of my own personal creativity and shows me how I both see and react to the world whenever I am able to disengage my brain. Whereas with SHOTS 3 and 4 I was fully aware of my intentions before I took the shots and that was to create something that would have both a sense of place and a purpose and which would show you just how beautiful Scotland is. Yet as far as I can tell SHOT 5 (and 1 and 2) seem to do the exact opposite and say more about me and who I am as a photographer, than they do about the location or how I took them. How to get there - Allt na Subh - Street View - Map View. Driving from the Isle of Skye on the A87 heading towards the Eilean Donan Castle car park about 10 miles further on and then passing through the villages of Reraig, Balmacara and Achtertyre, you will eventually come to a left hand turn pointing you towards Sallachy about half a mile before you reach the castle - Street View - Map View, take this left hand turn. Now continue driving along this single track road for another couple of miles or so, as it follows alongside Loch Long on your right and until you come to a road sign for Allt na Subh on your right, with a passing place just passed the road sign, but with enough spare ground at the back of the passing place for you to park safely and park here. You should now see the views as shown in SHOTS 1, 2 and 5. And, when you are finished shooting there, if you now start to walk back down the road a little way towards where you drove into the glen, you will see a stone wall on your left. Try to find a location near this wall where the trees are not obscuring your view too much and set up your camera there, for SHOTS 3 and 4 . Now what I did to shoot over the bushes that are sitting just behind this wall, is I climbed up onto the wall and set up my tripod on the top of the wall with two of its legs and with the third leg fully extended down onto the road - I use a really tall tripod by the way and even though I very rarely use or need the extra length of the fourth leg extensions, there are occasions when this extra couple of feet, can make all the difference between getting the shot or not getting the shot and this was certainly one of those occasions. |
 |
 |
|
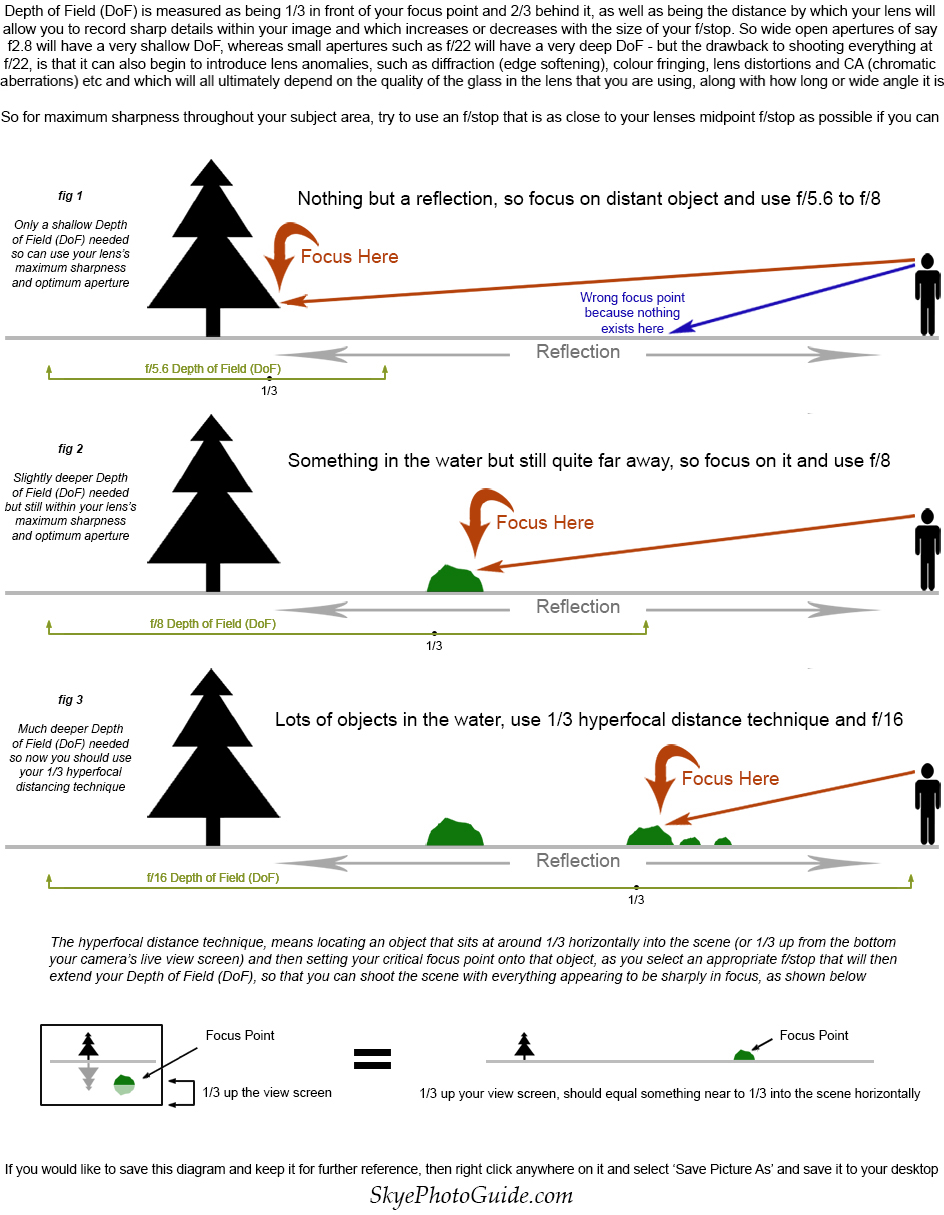
Tip: where to focus when shooting reflections? Well it all depends on your foreground of course and if there is anything in it or not other than the reflection, so let me explain: If for instance you are shooting a reflection that is just a simple reflection and where there is nothing but the reflection in the water in front of you, (no rocks, grasses or trees etc) then focus on the opposite shoreline, or the first solid object you can see nearest to the horizontal centre of the reflection. Which if this object or opposite shoreline is a long way away from you, means you should also be able to open up your lens to its optimal midpoint f/stop such as f/5.6 or f/8 to maximise sharpness. The reason you can do this when there is nothing in the foreground, is because even though parts of the reflection such as the sky may appear to be in the foreground water just in front of your feet, it isn't, it is just an optical illusion and there is nothing there. Because what you are actually seeing as a reflection, is only a horizontal replication of what you are seeing on the vertical plane that is coming towards you from the opposite shoreline and which is then being distorted flat across that horizontal plane as it stretches towards you. So why does all this matter? Well I often see photographers trying to apply the 1/3rd hyperfocal distancing technique, to focus on something in the reflection that is 1/3 into the scene from where they are standing and that only exists as part of the reflection, which is definitely not what they should be doing, because they are then trying to focus on something that does not actually exist, whereas the opposite shoreline or actual objects in the water do exist. OK I know, this is all getting unnecessarily complicated isn't it and I am even starting to confuse myself now, so perhaps it may be easier if I show you (and me) what I am trying to say in the diagram below: |
|
 |
|
--Exif information for each of the numbered shots shown throughout this chapter --1 - Canon EF70-200/2.8L IS USM, 1/120th Sec, f/11, ISO 100, Focal Length 200mm, taken on 15th Nov at 12:04 --3 - Canon EF70-200/2.8L IS USM, 1/20th Sec, f/11, ISO 100, Focal Length 95mm, taken on 15th Nov at 12:24 --4 - Canon EF70-200/2.8L IS USM, 1/160th Sec, f/11, ISO 100, Focal Length 100mm, taken on 15th Nov at 12:31 --5 - Canon EF70-200/2.8L IS USM with 1.4x extender, 1/15th Sec, f/11, ISO 100, Focal Length 280mm, taken on 15th Nov at 12:54 |
|
If you have enjoyed reading these 'Extra' chapters to my Guide Book and think you might also enjoy reading 79 more chapters across 270 pages, that also includes more than 340 Fine Art quality images, along with detailed descriptions and large scale maps to guide you to the exact location of where I took each and every one of them and which then goes onto discuss the techniques and tools I used to process them, but where everything is written in plain easy to understand English? Then please consider buying the Book. |
|