East Sutherland and the Caithness Coastline (Part 2 of 2) |
...continuing on to Part 2, of this week long photographer's guide, around the beautiful and very photogenic, Caithness and the South Sutherland regions of Scotland.
And what a fantastic location for landscape photography, this seldom photographed area is. With a stunning, narrow, steep sided gorge, crisscrossed by several wooden bridges over the Golspie Burn and with a beautiful waterfall, surrounded by bright green moss at the top of it. A hidden away village, that not many people are aware of and that looks like time forgot. Abundant wildlife, dramatic seascapes, sea stacks, troops of pretty wild flowers at the side of the road and even an old and very photogenic lighthouse, that has yet another rarely photographed waterfall right next to it. So hold on tight, as I continue on with this whirlwind tour, of the many photographic viewpoints I have discovered, around the South Sutherland and Caithness regions of Scotland. Most of which, you have probably never seen, or heard of before.
So let's get started. |
|
|
|
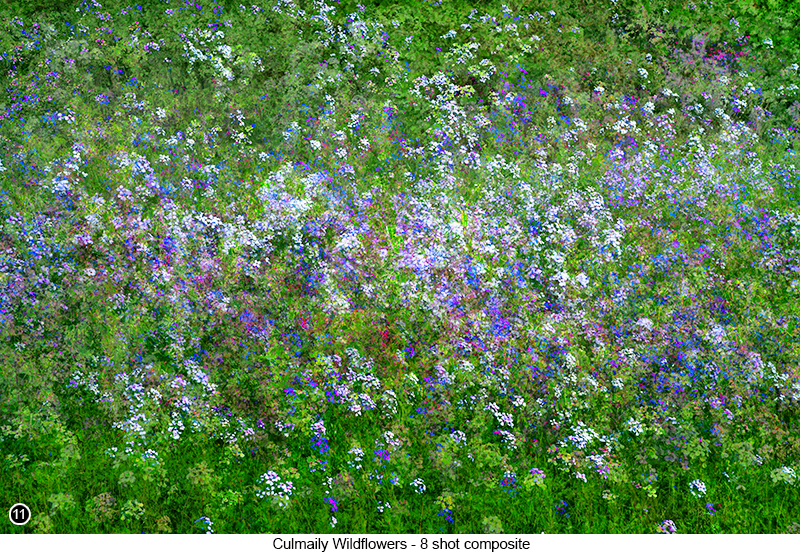
How to get there: Culmaily Wildflowers: Continue driving North an the A9 from the Mound (as covered previously in Part 1) and drive for another 2.5 miles or so. Where you will then come to an area in the village of Culmaily, with lots of different coloured wildflowers, growing right at the side of the road. As shown in SHOT 11 above, Street View, Map View. Unfortunately, the map view link above, currently shows you this area in winter, so there are no wildflowers to be see anywhere. But trust me, in early June, the road here next to this junction, is completely lined with them. And which seem to grow in thickly populated groups, that are just waiting to be photographed. You will also see, several short tracks on the right side of the road, that lead down to some fields. Which are also surrounded by the same types of wildflowers and where you can park on the grass verge next to the track. But do it in such a way, that you don't block off access through the gates, as the farmer will be coming in and out of here regularly - trust me I know, as we had to move out of the way for him and his tractor. But wherever you manage to park and assuming you are here at just the right time of year, you will see lots of wildflower compositions all around you, that are just waiting for you to photograph. |
|
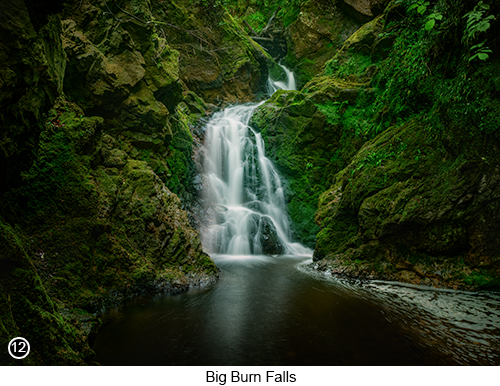
| However instead of showing you a series of single shots of the wildflowers, I chose to make my shots, into a sort of abstract composite. As shown in SHOT 11 above and here is how I composed it. Tip: Using my 24-105 zoom and autofucus, I got into a position standing in the grass at the side of the road, where I could fill the frame, with as many of these wildflowers as I could. I then started to shoot the flowers face on, as I crabbed sideways along the edge of the road, shooting my way to the right. But without changing the focal distance of the lens, or my distance from the bank of flowers. I was also trying to overlap each shot, by about 50% of the previous shot. I then blended the images into a composite image, by loading all the files into a none aligned stack in PS. Then using a combination of layer blend modes (Soft Light, Lighten and Darken etc) and masks, until I was happy with what I was seeing. The second shot in this chapter, I am showing you to the right in SHOT 12. Is of the Golspie Burn waterfall, which can be found at the top of a steep sided gorge. Where these pretty falls, are more commonly referred to locally, as the "Big Burn Falls". Big Burn Falls: to get to the "Big Burn Falls", go back to the A9 and continue driving North for another two miles, until you enter the village of Glospie. Where you will find the Golspie waterfall and gorge hiking trail, at the far end of the village. So keep driving through the village (where you will pass a really good "Chippy" on your right, called the "Trawler". Which if you are hungry? I advise that you treat yourself to a fish supper, with a small carton of curry sauce on the side). But I digress and am even beginning to slobber over my keyboard, just thinking about it... |
 |
So continue driving through the village, until you are almost out of the other side and where you will then find a large official car park on your left - which isn't that easy to see from the street view link to the right, but it is there and is actually more easy to see when you get to it, Street View, Map View. And park wherever you can, nearest to the info board and the path that leads into the woods. But, before you leap out of your vehicle and set off yomping into the woods, weighed down by your backpack, tripod and camera. It is worth noting, that there are in fact two ways to get to the Big Burn Falls. Route 1 - which is much easier and good for old photographers like me, at just over one mile long, from the "Big Burn Falls" back to the main car park. Route 2 - which is for those of you, who would much prefer and enjoy, a two and a quarter mile round trip hike, all the way up to the "Big Burn Falls" and back again. |
|
|
Route 1 from the Backies car park - which, if you are with your partner (as I was) and your partner is willing to drop you off at another parking area, directly above the falls. So that you only have to walk the 1 mile back down through the gorge, to the main "Big Burn Falls" car park, where your vehicle is parked. Route 2 from the 'Big Burn Falls' car park - where you can walk just over a mile to the top of the gorge and the Big Burn Falls. As you cross over several small wooden bridges along the way and then all the way back down again to the main car park. Because I took route 1, I will now describe where to park for this route. As well as the fact, that if you prefer to take route 2, you should already be parked in the main "Big Burn Waterfall" car park anyway and waiting to go. So gerronweeit..! What we did, was agree that it would be better for both of us, if took route 1 and my wife took route 2. Because she really loves bird watching and could spend as much time as she liked doing that, as she walked up through the gorge to meet me. As the only gear she carries, are her binoculars. Whereas I am not into bird watching, but instead deeply into landscape photography. Which means I'm always lugging around a tripod and several lenses etc,. And, as I have recently upgraded my camera. I find that Instead of taking only the new one out with me, I now take them both, just in case. So for route 1 and the much easier 'one way' hike through the gorge. Get back onto the A9 and continue driving North out of the village of Golspie, for just under a mile or so. Until you see a road sign on your left signposted for "Backies" and take this left hand turn, Street View, Map View. |
But be aware, this is a sharp left hand turn, into a small, single track road. That cuts off at an acute angle from the main A9 road, which at this point, has a 60mph speed limit. And where you will immediately drive under a small, tight squeeze of a low bridge. So you need to be aware of any vehicles coming up fast behind you, before you make this turn. As you are going to need to slow right down, to around 10mph when you do. Also I would advise, not trying to make this turn up to Backies, coming from the opposite direction. As you will cause nothing but chaos, as you block off the road waiting for a gap, in the constant flow of fast moving traffic heading towards you. Then once having left the main A9 road, you are going to drive up this single track road, for maybe another couple of miles or so. Until you see a medium sized car park on your left, with an information board in front of a stone wall and a path that goes through the wall, into the woods behind and park here, Street View, Map View. |
|
 |
|
Then, after your partner has dropped you off. Walk down the path to the right of the car park and then into the woods on your right. Where you should already be able to hear the falls below you to your left, as you walk up through the woods. You will then come to a smaller path that forks off down to your left, just a couple of hundred yards into the woods. Take this path down to the left. You will then find yourself walking down quite a rough, unmaintained path, to the Golspie Burn Falls, with a small viewing platform half way down, that looks over the top of the falls. But which I didn't take any photographs from, as the falls are mostly obscured by branches and leaves at this viewpoint. So continue walking down this path, until you reach the Burn at bottom of the gorge and turn immediately right. Where the path now takes you over a bridge, to another fork in the path. With one path going up the hill out of the gorge and another path heading off to the right, that takes you to the Golspie Burn Falls, as shown in SHOT 12 above. So turn right here and head for the falls. Then once at the wooden viewing platform, set up your tripod at the furthest point to the far right corner of the platform, nearest to the falls. |
|
 |
|
You will probably find that you are mostly going to be alone at the falls, but with the occasional hiker, popping in for a look and to take a quick snap of the falls on their phone. Which you need to be aware of, because there isn't much space on the viewing platform, for more than a couple of people. So you should be ready (and willing) to step aside and temporarily move your camera and tripod out of their way, so they can get their shot of the falls. This is also a good idea for you, to help maintain the quality of your images. As you will be working on a wooden platform, where every time someone moves, it wobbles and vibrates and so will ruin your shots. So I found the best and friendliest way to work around this, was to give them all the space they needed. To allow them do their thing as quickly as possible, as I chit chattered to them, waiting patiently for them to move on. Which they invariably did after only a few minutes. So I could get back to doing what I came here to do and that is to take a sharp, long exposure shot of the "Big Burn Falls", as shown in SHOT 12 above. |
|
 |
|
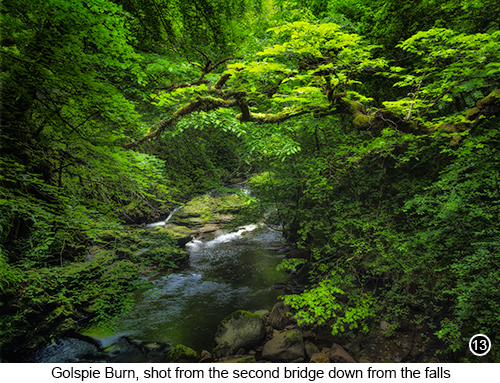
Then, once you finished shooting the "Big Burn Falls". If you set off walking down the path through the gorge, heading back towards the main car park (where your vehicle has now been parked by your partner). You will then come back to the same wooden bridge, you crossed over previously on your way up to the falls. So cross back over the bridge and continue walking along the bottom of the gorge, for a few hundreds yards more. Until you come to the second wooden bridge down from the falls. Which is where I took SHOT 13 of the Golspie Burn, as shown above. There was nothing too fancy going on for SHOT 13. As all I did when I got there, was to lean over the side of the bridge a little. Before grabbing this hand held shot of the scene, using my 24-105 zoom, before quickly moving on, looking for my next opportunity. Yep sometimes, a shot that you are really happy with, really can come this easily. Although mostly not. But every now and then, it's just a matter of being there, seeing a composition and firing off a few shots of it. Before walking on by and looking for more. |
|
 |
|
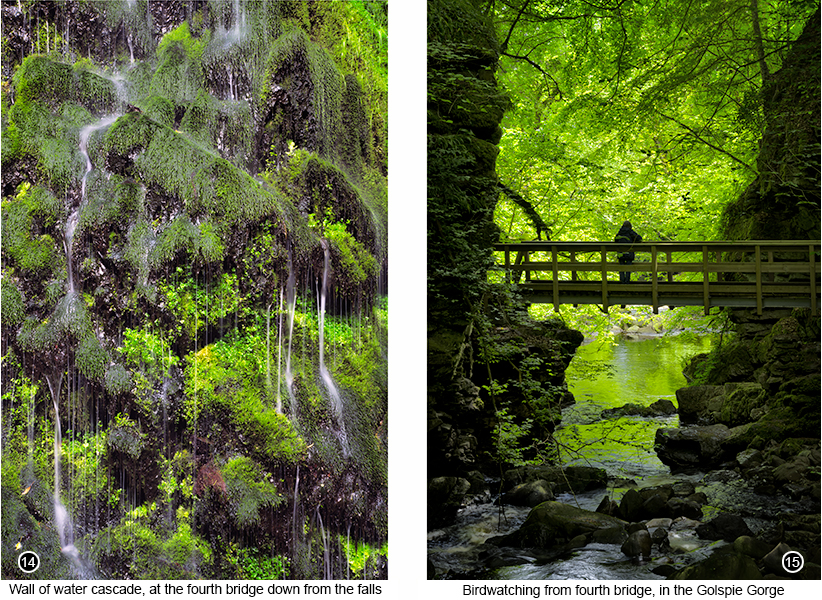
I then continued walking down through the gorge, to the fourth wooden bridge from the falls and where I took another couple of shots, as shown in SHOTS 14 and 15 above. But this time using my tripod etc. Where SHOT 14 is of a water cascade, that flows down the wall of the gorge at this point. To show you the type of fauna, that this continually dripping water supports. SHOT 15, is of my wife looking for birds in the canopy and hoping for another glimpse, of the Spotted Flycatcher she'd just been watching. But is also a shot, that shows you the narrowness of the gorge at this point and the type of wooden bridges you will be crossing over, as you photograph your way through the Golspie Gorge. |
|
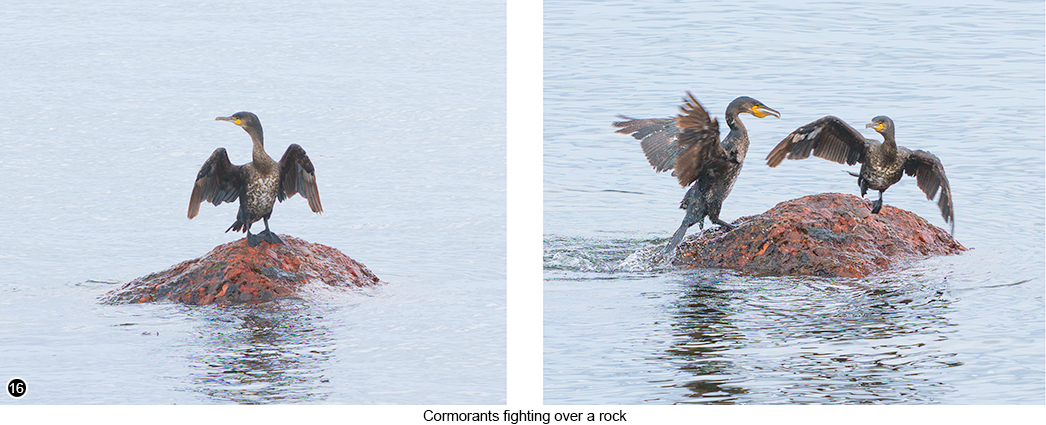
Brora and the Cormorants: Once you have finished photographing the Golspie Gorge, if you return to your vehicle and get back on the A9, still heading North for another six miles. The next village you will arrive at, is called Brora and is where I grabbed a couple of 'action' shots of Cormorants, fighting over a rock in the bay. As shown in the two image composite SHOT 16 above. Now as I have mentioned before, in several other chapters on this site, I am not a wildlife photographer and never will be. So I never go out, with the intention of looking for or shooting wild animals. But as these cormorants, were just sitting there waiting to be photographed, only a short distance from the upper shoreline edge and such an obvious and easy target to shoot. I thought why the heck not and how it could even seem rude of me, not to grab a couple of shots of them and so here they are. So continue driving through the village of Brora, until you come to a dip in the road, with a turn to your right called Harbour Road and turn right here, Street View, Map View. You will then go under a bridge and around to the back of the village, where you will find a large parking area next to the sea, Street View, Map View and park here. It seems that Cormorants love to sit on rocks, that rise up just above the water, to dry out and spend time preening and re-oiling their feathers. Which as there are a lot of rocks in this bay, right next to the car park. Dozens of cormorants are attracted here. However as most of these rocks become fully submerged as the tide rises, the cormorants are forced to use rocks, that are closer and closer in towards the land. |
|
Which means if you are here at high tide, then it really is just a matter of standing next to your vehicle and grabbing as many handheld shots of them as you like. Because it really is this easy, when the tide is high. Obviously it is not a good idea to get too close to the Cormorants, or they will simply fly away and find another rock to sit on. But if you stay in the car park and try to remain semi obscured, behind the low grassy bank and park bench, nearest to the top of the shore. You will be fine and should be able to click way, grabbing shots of them squabbling and preening, for as long as your heart desires. |
|
 |
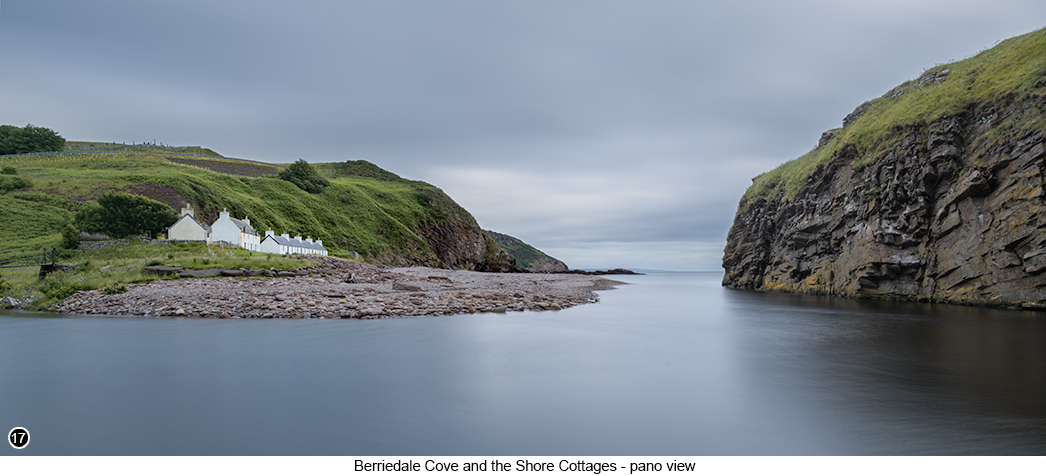
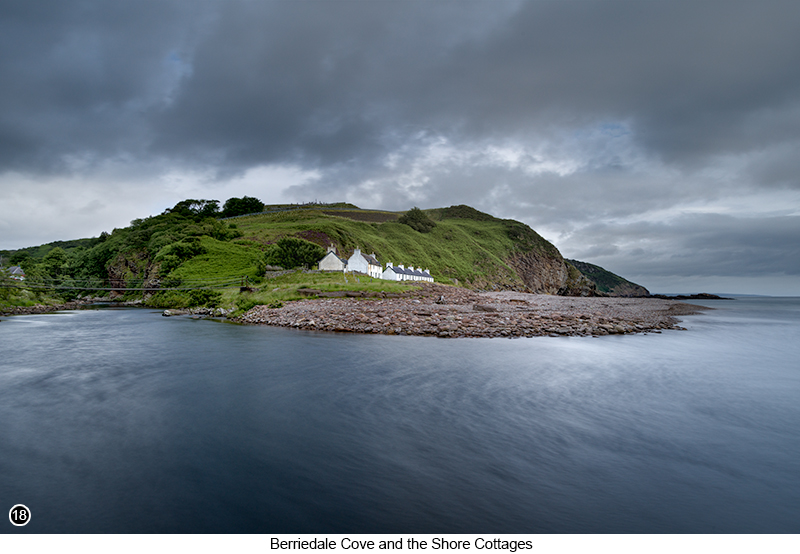
Berridale Cove: then having shot the cormorants at Brora. If you get back on the A9 and drive North for another 18 miles or so. Until you come to a very steep part of the road, with the tiny village of Berriedale hidden away down at the bottom of it. Now look for a turn off on your right called Mill Road, which is where we are going to be shooting next. But don't drive in here, just keep going a little further, Street View, Map View. You are now going to be working in a very sleepy, hidden away, chocolate box pretty coastal village, as shown in SHOTS 17 and 18 above. That not many people seem to know about, or have photographed before. So I think we all need to be mindful of this fact and try to cause as little disturbance down here as we can. Because I know what will happen, if too many people start to crowd into this village at the same time. And that is, the estate owner will put a sign up next to the A9 Mill Road turn off, saying how this is now a private road, that can only be accessed by residents. Believe me, I know how easily this can happen and have in fact seen it happen before. As too many small, "off the beaten track" locations in Scotland, have already done just that. In an attempt to stop the NC500 visitors and campervanners, taking over their pretty little villages. So treat this location with respect and go here alone (if possible) and be as unobtrusive as you can. So that the residents don't get spooked, by the occasional photographer wandering through their tiny village. Or have chance to realise, how they are living, in a potential photographic honey pot location. In other words, if we abuse it, we lose it... |
So what I suggest you do (and what we did), is not to turn right into Mill Road at all, but instead carry on driving just a few yards further, until you see another turn off on your left, with a blue and white sign for a tea room and turn left here. Then go into the tearoom car park and park as far away from the entrance as you can. With the intention of leaving your vehicle there for an hour or so, while you go across the road, to take your photographs of the cove. But then, as a way to pay for your free parking, go into the tearoom and get something to eat. Or buy something from their selection of really good, high quality gifts - if you do decide to have something to eat, then go for the "Bothy Burger". Trust me, you will not be disappointed. |
|
 |
|
Then after you finish treating yourself, to whatever it is that you chose to buy. Walk across the A9 and back towards Mill Road and then down into the village of Berridale. Where you will then see, as soon as you walk around a corner to your right, past some old buildings on each side of the road. How there is a river running down to the sea on your left, next to a cliff. With a large wooden gate, that spans across the road ahead of you. Then walk through the gate (closing it securely behind you of course) and on down past the wire rope bridge on your left. And on past the tiny stone harbour, to an alcove in the rocks next to the sea. Which is where I setup my tripod, to take a long exposure shot of the scene, as shown above in SHOT 17. |
|
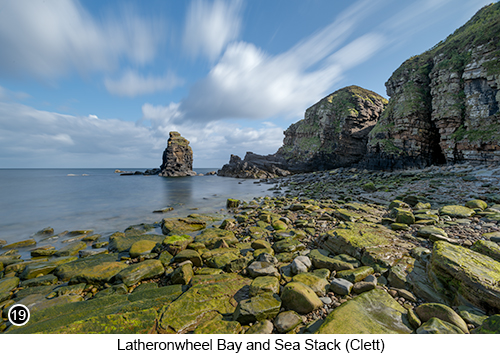
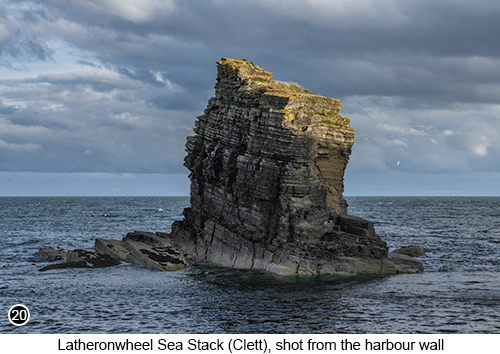
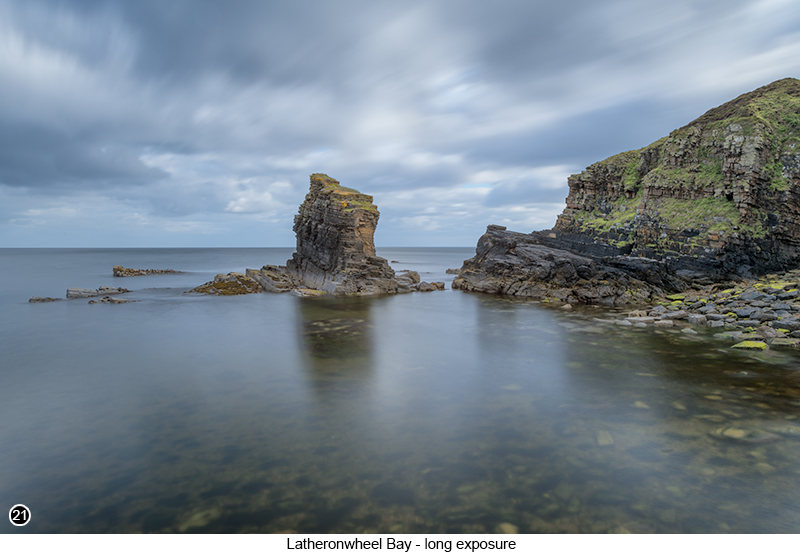
I then moved back up onto the cobbled area of the harbour and setup my tripod on the front edge of it, just to the right of a small boat crane. Where I then took a shorter exposure shot of the scene for the sky and a longer exposure shot for the sea. Which I then blended back together in Photoshop, to create a "time bracketed" view of the scene. As shown above in SHOT 18. There are lots of photo opportunities in the cove at Berriesdale, even though it is just so ridiculously tiny. But once you are there and can see the potential of the place, I know you will want to spend several hours (and several visits) down here with your camera. Tip: "Time Bracketing" is just like exposure bracketing (and can even include an element of both), except you have to do it manually yourself and use a tripod. Where I wanted the sea in SHOT 18, to be flattened out a little and with much less detail, but not look like an ice skating rink, as I did for SHOT 17. But at the same time, I also wanted the sky to remain highly detailed, as well as looking dark and moody. So I setup my camera's focus point, depth of field and exposure time etc, manually. To grab a shot of the scene, with a 1/100th of a second exposure for the sky. Where the clouds then looked slightly underexposed, but not moving. I then threw on a 3 stop ND filter and without changing any of the settings, other than the length of the exposure time to 5 seconds and bumping up my ISO a bit. I took a second shot for the water. It was then a relatively simple process, to combine the elements I wanted from both shots, into one. As the camera hadn't moved between each frame and so nothing other than the length of exposure time had changed. Latheronwheel Sea stack (The Clett): next I am going to take you to a place called Latheronwheel, as shown in SHOTS 19, 20 and 21 above. Which is yet another tiny hidden away location, that just oozes photographic potential. But this time, there are no houses or residents in this bay to disturb and the parking here is both free and unlimited. Which means we can spend as long as we like here, shooting every aspect of this location. And, unless you are really unlucky, you will probably have the place mostly to yourself and what a fantastic location for photography it is. It is said in historical documents, dating from the late thirteenth century, that the name "Latheronwheel", was derived from its original Gaelic name of, "Làthair Ròin". Which translates into English as, "The Resort of the Seals". Which fits in neatly with the fact, that even to this day, this area of the South Sutherland coastline, is home to a large number of seal colonies. Which you will probably see some of them when you are here, corking and napping, a little further out into the Latheronwheel Bay. The name "Clett", which is given to the sea stack, next to the Latheronwheel harbour. Is thought to have been derived from the Gaelic word of "Cleit", meaning rock, or large rocky outcrop, Which in turn was itself derived, from the even older Norse word of "Klettr", meaning a rock, or cliff'. |
 |
So to get here, continue driving North on the main A9 road, for another 35 miles. Until you come to a turn off on your right, signposted for Latheronwheel and turn right here, Street View, Map View. Where you will then drive all the way through the village, until you come to a single track road at the end of it, that takes a sharp turn to the right. So turn right here and continue down this road, all the way to the large car park at the end of it and the tiny, picturesque harbour you will find there, Street View, Map View. I have found that as far as the tide, weather and seasons goes, there is no best time to be here, in the Latheronwheel harbour area (although I am sure a beautiful dawn in the middle of winter would be amazing). Because every time I have photographed here, no matter if it was high tide, low tide, raining or shining, or a combination of any of the above. I have always been able to walk away, with something I am very happy with, every single time. Because it is just that good for photography down here. Now admittedly, alternative shots of things other than the sea stack, are somewhat limited in this tiny little bay. But who cares, when the main subject you will be working with, is just so photogenic from any angle and so easy to shoot. |
|
|
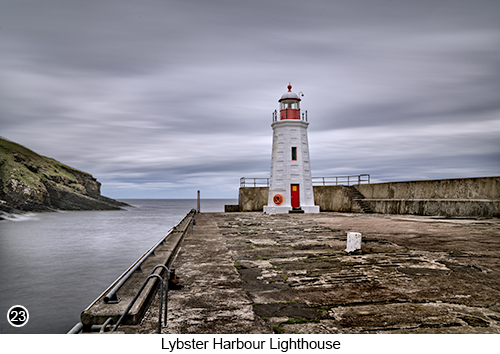
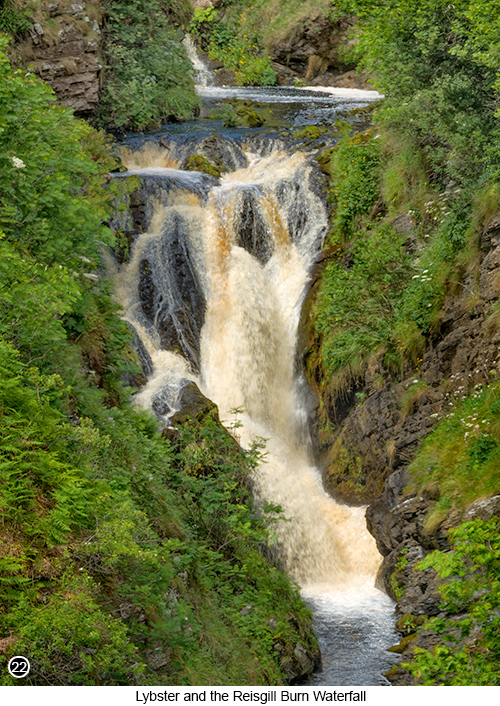
For SHOT 19, I walked back up from the car park and over the old stone bridge to the left and over to the other side of the burn. Where I then followed the path, down past the old ruined croft house, before setting up at the back centre edge of the beach. I particularly liked this view and framing of the sea stack, because it allowed me to place it near to a compositional third. As well as to highlight, the bright green colour of the seaweed covered rocks and use the bay itself, as a sort of mirrored "C" curve, that leads the viewers eye through the shot and all the way out to the Clett Sea stack The second view of the sea stack, shown in SHOT 20 above. Was taken handheld, after a heavy downpour had just passed through, as I walked out to the very end of the harbour wall. SHOT 21, was taken from the side of my vehicle, using my tripod and a 10 stop ND - in fact if I am not mistaken, I think I was drinking a cup of tea as I took it. Lybster Harbour Lighthouse: then having finished at Latheronwheel, get back onto the A9 and continue heading North for another 5 miles, until the main A9 road turns off at a junction to your left and the road you are now driving on, becomes the A99. So keep to the right and heading North, along the side of the coast on the A99, for another 6 miles or so. Until you eventually come to a tiny village on your right called Lybster, Street View, Map View. So take this right hand turn and drive down through the village, firstly along Village Road and then Main Road. Until you see a sign pointing to the right for the harbour and take this turn, Street View, Map View. |
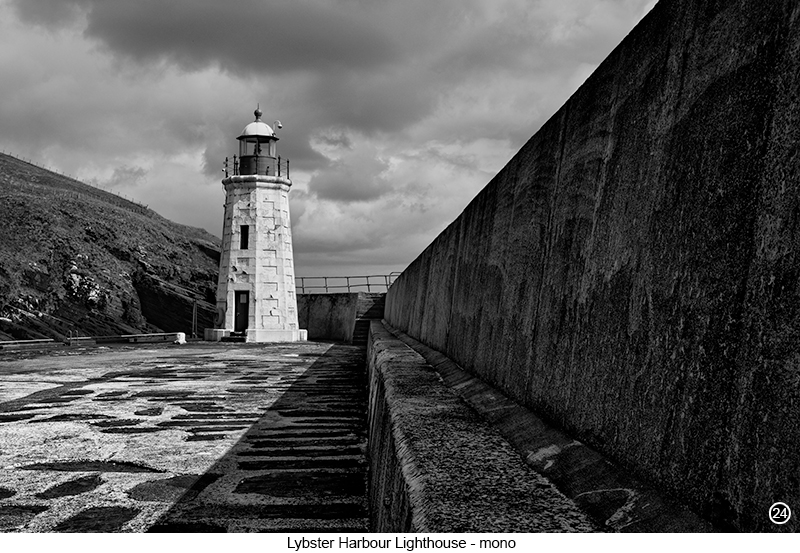
But before you drive all the way down into Lybster harbour, you will first come to an old stone bridge, with the pretty "Reisgill Burn Waterfall", flowing through a deep gorge to the right of it, as shown in SHOT 22 above. The name Reisgill, being derived from an old Norse word, meaning "Brushwood Ravine" But unfortunately, there is nowhere to park near to the bridge overlooking the falls. So drive down into the harbour and park there, then walk back up to the bridge, to shoot the falls. But be aware, this is still a fully working fishing harbour, where fisherman land their catch daily and which is then hauled away by large refrigerated trucks. So you need to make sure you do not block access, to where the fishermen are landing their catch, or to where the trucks need to drive in and out, of this tiny little harbour. So park with care. Then after shooting the falls, continue down the road all the way to the harbour, to a view of its old, tiny and very photogenic Lybster lighthouse, as shown above in SHOT 23 and below in SHOT 24, Street View, Map View. |
|
 |
|
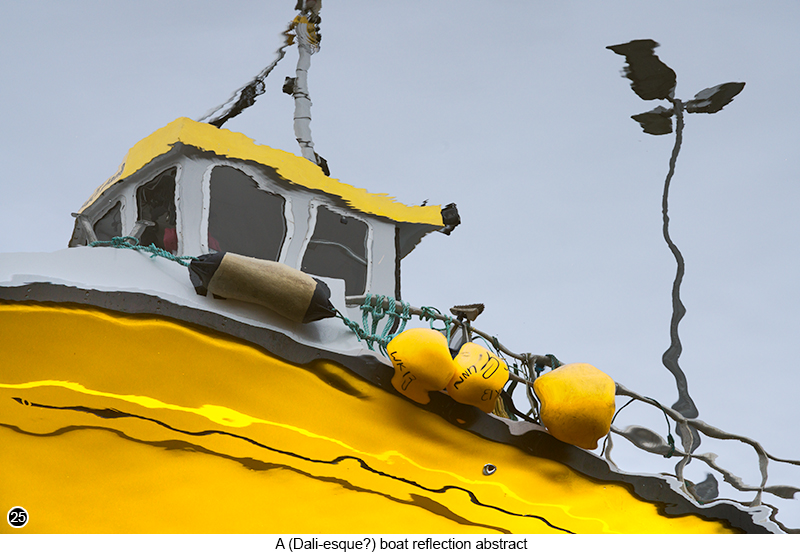
Then, after shooting the Lybster lighthouse from various angles. I decided to have a wander around the back of the harbour and up to the flat bridge near to the top of it and where the Reisgill Burn flows under it. When out of the corner of my eye, I spotted this bright yellow fishing boat, as shown in SHOT 25 below. Which was moored next to the harbour wall below me and how its reflection, was rippling and moving around, in a very appealing abstract way. So I grabbed a few handheld shots of it and then moved on, without giving it a second thought. Then when I got home and started to work on the file. I thought well, as it's an abstract and so doesn't really have any connection with reality. I should flip it back the right way up and then flip it again horizontally, to remove the mirror effect. From what is essentially, a picture of wavy water and this is the result, as shown below. Now I am not saying SHOT 25 is in anyway a great work of art, it isn't. It's just a fun image that I really enjoyed taking. As I strolled around the back end of the old Lybster harbour, where no one normally goes. And isn't that what photography is all about, having fun and looking for shots, where most people would least expect to find them? |
|
 |
|
Whaligoe Waterfall and Harbour: when you are in the Lybster area and if you have time to explore, an even more dramatic part of this coastline. Then perhaps you should think about visiting, the "Whaligoe Waterfall" and harbour. Which is said to be, the most remote and inaccessible harbour in Scotland and maybe even the world. Where according to the Walkhighlands website, you have to walk 330 steps down the side, of an almost sheer cliff face, to get to the harbour and then 330 steps back up again. Which for an oldie like me, carrying all my camera gear, it just wasn't going to happen. Well at least not without the aid of an air ambulance. So even though I am sure, the images, wildlife and photo opportunities you will find there are amazing. I decided to sit this one out and let you discover, this last location in my photographer's guide for yourself. |
|
--Exif information for each of the numbered shots shown throughout this chapter <--- The reason why the dates shown below, appear to span over several weeks, is because I visited these locations at slightly different times over the years ---> --11 - Sigma 24-105mm F4 DG OS HSM | Art, 1/200 Sec, f/16, ISO 200, Focal Length 95mm (8 shot composite), taken on 13th Jun at 10:36 onwards --13 - Sigma 24-105mm F4 DG OS HSM | Art, 1/160 Sec, f/16, ISO 200, Focal Length 105mm, taken on 11th Jun at 12:55 --15 - Sigma 24-105mm F4 DG OS HSM | Art, 1/4 Sec (-/+ 2 stop bracket), f/11, ISO 100, Focal Length 35mm, taken on 11th Jun at 13:34 --18 - Canon EF16-35 f/2.8L USM, 1/100 and 5 Sec (2 shot time bracket), f/13, ISO 100 and 200, Focal Length 22mm, taken on 23rd Jun at 10:38 onwards - 19 - Canon EF16-35 f/2.8L USM, 30 Sec, f/16, ISO 50, Focal Length 16mm, taken on 9th Jun at 16:38 --21 - Sigma 24-105mm F4 DG OS HSM | Art, 30 Sec, f/13, ISO 100, Focal Length 24mm, taken on 19th Jun at 19:35 --23 - Canon EF16-35 f/2.8L USM, 30 Sec, f/14, ISO 320, Focal Length 26mm, taken on 27th Jun at 13:53 - 24 - Sigma 24-105mm F4 DG OS HSM | Art, 1/250 Sec, f/16, ISO 250, Focal Length 38mm, taken on 9th Jun at 15:01 |
|
If you have enjoyed reading these 'Extra' chapters to my Guide Book and think you might also enjoy reading 79 more chapters across 270 pages, that also includes more than 340 Fine Art quality images, along with detailed descriptions and large scale maps to guide you to the exact location of where I took each and every one of them and which then goes onto discuss the techniques and tools I used to process them, but where everything is written in plain easy to understand English? Then please consider buying the Book. |
|