Bow Fiddle Rock Featuring yet another iconic location in Scotland and one that EVERY Landscape Photographer should plan to visit at least once in their lives and who when they do, are pretty much guaranteed to walk away with at least one portfolio grade image, if not more! |
|
Setting The Scene - The Bow Fiddle Rock viewpoint as shown in the images throughout this chapter, can be found on the East coast of Scotland, alongside the Moray Firth coastline and right next to the seaward edge of the village of Portknockie. The Bow Fiddle Rock structure that you will see there today, is just the sea worn tip of a huge column of 750 million year old Cullen Quartzite rock, that then extends down through the earth’s crust for another 8,000 feet. The Bow Fiddle Rock sea stack is believed to have been first given it's name, when visitors to the area in the early Victorian era during their 'Grand Tour' holidays, noticed that the angular shaped tip of the rock on the right of the sea stack, along with the shape of the hollowed arch beneath it, looking very much like the tip of a fiddlers bow. Bow Fiddle Rock now attracts many visitors per year, as well as many of us landscape photographers of course, but has also now become a well known location for wildlife watchers, as the stack is also commonly used as an annual nesting place for a wide variety Gulls and seabirds, such as Herring Gull, Lesser Black Backed and Greater Black Backed Gulls etc., as well as many other types of seabirds such as Cormorants, Razor Bills and even the occasional Puffin etc. How to get there - Street View - Map View. Head North from Aberdeen on the A96, until you eventually come to a roundabout with a turn off on the A98 towards Fraserburg Street View - Map View. Then continue driving East on the A98 towards Fraserburg, until you eventually reach a junction on your left pointing you towards the village of Portnockie on the A942 Street View - Map View. Then after entering the village, continue driving on down towards the seafront until you reach Addisson Street Street View - Map View. Now follow Addison Street right to the very end and park wherever you can near to the grass bank on your left, but without blocking the entrance to the workshop or any of the other work buildings next to the path. |
Then out of your vehicle, just follow the path that leads you down past the workshop on your left and then on towards the sea a couple of hundred yards directly in front of you, until you reach a steep but short path that leads you down into the bay proper. Then once in the tiny bay, it then becomes a relatively simple process of choosing where you want to stand and setup your kit. But whichever way you choose to shoot the scene and from whichever angle, the main subject of your shot (Bow Fiddle Rock) is always going to want to be located somewhere near the centre of your frame, so instead of trying to fight against this and force it onto a compositional third, go with it and do what the scene is telling you it wants you to do. Now obviously you can still try to place the main Bow Fiddle Rock sea stack off to the left or the right and apply the usual one third compositional framing, that we are all more than familiar with if you really want to, but I find from my experience of shooting here several times and as you can see from all the shots I am showing you throughout this chapter, that to my mind there really does seem to be only one way to shoot this scene successfully and that is to shoot it with the main subject straight down the middle of your shot. So I would suggest that if you are one of those photographers, who have become a little too firmly attached to always shooting every scene, using as many of those well worn compositional rules as you can, then trust me on this one and let the rules based part of your mind have a day off and instead try to use the weight and width of the base of the Bow Fiddle Rock structure, as it sits near to the horizon line as your central anchor point instead and which should then add sufficient balance to the centre of the scene, so that it overrides any need to apply the rule of thirds. So if you are willing to accept this and give it a go and shoot this particular scene as I am suggesting, then it means you will also need to try and previsualise your shots, with the intention of cropping them into something akin to a square format later on the computer, as shown in shot ONE, TWO and FOUR. But as you may have already noticed in shot THREE shown below, that this centralising of both the weight and balance of your main subject within the scene, does seems to work just as well with pano's as it does in square format. Now please don't just take what I have said to you above as gospel, but instead have a quick search online and look at how other photographers have shot this scene over the years and look to see if you can find any shots that use the one third compositional rule, that you prefer over the ones that you see here composed for the centre? And please do not get me wrong, I am not saying my shots are better than anyone else's work, far from it, but what I am saying is could you find any other images online that you prefer, that do not also put the main Bow Fiddle Rock structure straight down the middle of the scene, or at least very close to it? No? Then I rest my case..! |
 |
 |
|
|
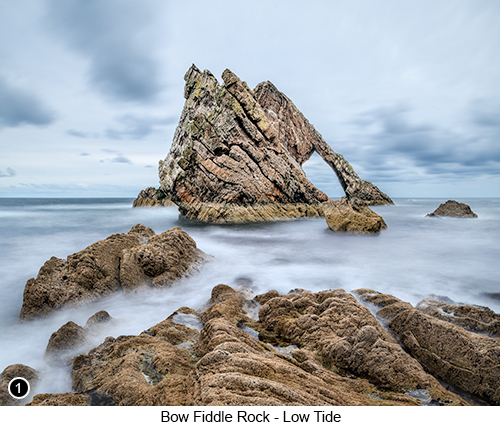
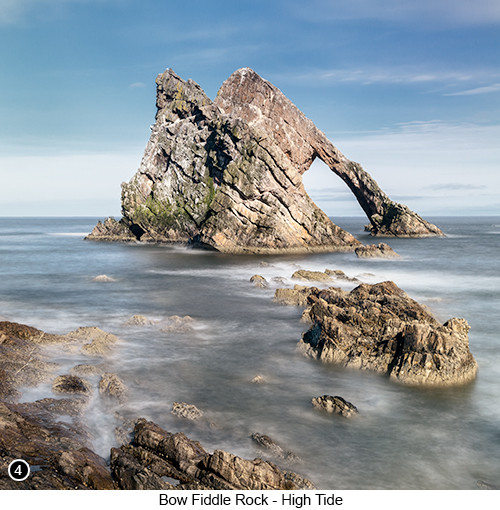
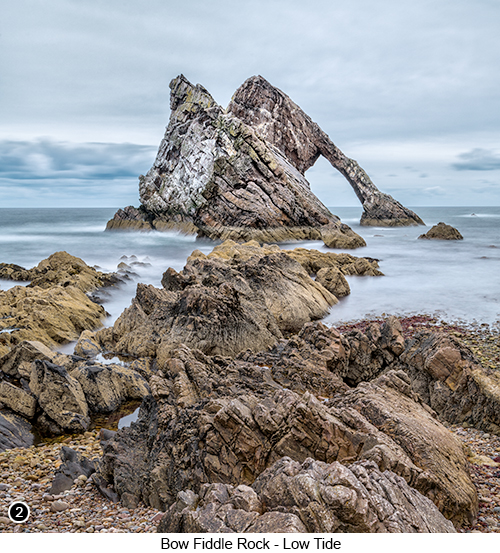
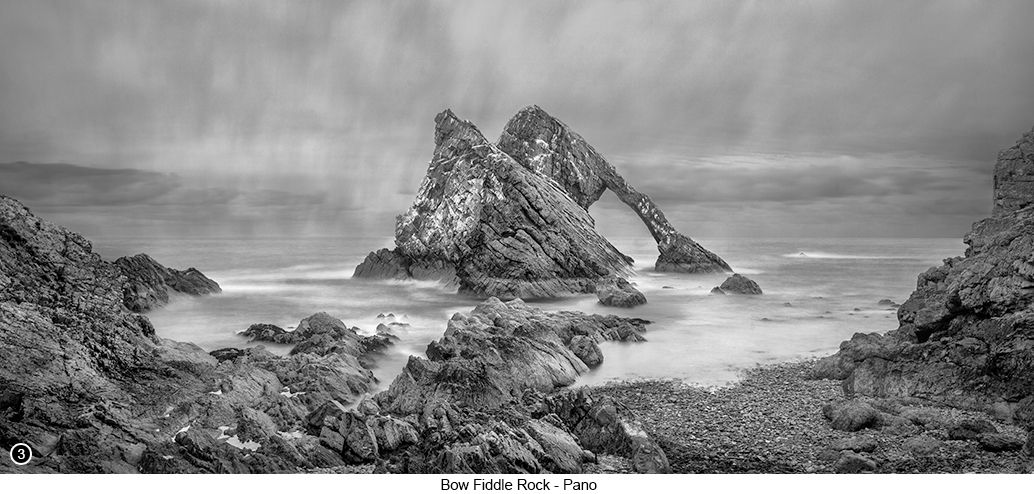
So here is what I did to shoot the first three shots shown above and which were all shot within an hour of each other on the same day: When I arrived at Bow Fiddle Rock, I could see that the tide was almost fully out. So I worked my way down to the edge of the water to the right of the bay and as close to the main rock structure as I could get on the pebbled beach and setup there. But this wasn't giving me anything like what I wanted, so I walked over to the left side of the scene and then wobbled my way over the slippery rocks to shoot the scene from there, as shown in shot TWO, which was a little better, but still not quite what I wanted. So I made my way back around to the front of the central rocks and clambered up on top of the rocks that lead out towards Bow Fiddle Rock and walked out as close to the rock as I could for shot ONE. I then tried shooting the scene in various formats, as a wide angle shot, then a vertical, then as a stitched pano. But as the tide had now turned and large waves were beginning to crash over the rocks in front of me and splashing me and my gear with seawater, I thought it would be a good time to beat a hasty retreat and wobble my way back onto dry land before I was cut off by the incoming tide - which I nearly was. I then stood back and just admired the scene for a little while, as the clouds started to close in above me and a curtain of rain began to blow across the scene in front of me. So without really thinking about it (and which is a state of mind that often seems to get me the best shots) and just as I was starting to pack away my gear before it got really soaked, I thought I would just take one last wide angle long exposure shot, just to show you the reader what the whole of the Bow Fiddle Rock Bay looked like for context and which got me shot THREE and which then turned out to be the shot I am most chuffed with. So was this last shot of the day as I was packing away my gear, some sort of absent minded accident? Well yes I suppose it was, but I do seem to do this quite often these days and that is to work a scene as hard as I can and in every way that I can think of, but to also occasionally just drop in a shot or two that are not so planned and that I haven't analysed to death before I took them and sure enough, they do occasionally produce something quite startlingly different (and I think shot THREE is a particularly good example of this). Where I end up with a shot that makes me think wow, that's a cracker, even though I took it when the conscious part of my brain wasn't even really thinking about what I was shooting, or hoping to achieve, whereas the subconscious part of my brain that told me to take the shot obviously did. |
So yes I know, most of you must now be thinking to yourselves that shot THREE was nothing more than a stroke of pure luck, or at worst I am now trying to sell you some sort of unexplainable mumbo jumbo about how I chose to shoot it without thinking. Yet all I can honestly say to you and with my hand placed firmly on my heart, is that this seems to keep happening to me, time after time. So yes if it is nothing more than pure luck, then so be it and I am OK with that and who am I to question it? But perhaps it really might be something deeper and that we all have hidden away within us, if only we are willing enough to allow it to rise to the surface occasionally and take us over for a minute or two, who knows? But what I can tell you and which is something that I am absolutely sure of, is that I am just so happy that it seems to keep happening to me and so all I am suggesting here, is that if you are willing to give this idea a go and concentrate a little less on what you are doing for perhaps one or two of your shots, then it might also start happening to you. So what I ended up doing to get shot THREE as I also began to strip down my kit, was that as I already had my camera setup for a long exposure shots using my 10 stop screw-in ND filter for both of the previous shots, I just lined up the shot to roughly encompass the whole of the scene in front of me and clicked the remote without really looking at what I was capturing. Then when the 30 second shot had finished and the rest of my kit was packed away, I removed the 10 stop ND and lowered the exposure time to 1/13th of a sec. I then locked my remote to on and let the camera fill up its buffer as I packed away the ND filter and just as the rain began to hit me in the face like a hale of tiny wet bullets. I then hurriedly wiped down my camera as best as I could in the circumstances and stuffed it back into my bag and headed back to my vehicle. Then when I was looking at my images back on the computer a few weeks later, I simply blended several of these final shots (including the long exposure shot) back together, using a very simple technique that I have developed for myself over the years and which is fully described at the bottom of page 125 in my book. Shot FOUR above, was taken on a completely different 'blue sky' day at high tide and so I thought I would throw this image into this chapter, just so you know what Bow Fiddle Rock looks like at hide tide - oh and I almost forgot to mention, that because Bow Fiddle Rock is located on the East coast of Scotland, it is also a very good location for a dawn shoot. So if you want to get really serious and have a go at shooting the Bow Fiddle Rock with the sun rising up in the centre of the hole in the arch, then you will need to be here either at the end of May or towards the end of the second week in August and at around 03:30 to 04:00 in the morning, if you also want to catch the best predawn light. |
|
|
--Exif information for each of the numbered shots shown throughout this chapter --1 - Canon EF16-35 f/2.8L USM, 30 Sec with 10 stop ND, f/16, ISO 100, Focal Length 16mm, taken on 24th Sep at 12:06 --3 - Canon EF16-35 f/2.8L USM, 30 Sec with 10 stop ND (and 1/13th Sec without the ND), f/11, ISO 50, Focal Length 16mm, taken on 24th Sep at 12:43 |
|
If you have enjoyed reading these 'Extra' chapters to my Guide Book and think you might also enjoy reading 79 more chapters across 270 pages, that also includes more than 340 Fine Art quality images, along with detailed descriptions and large scale maps to guide you to the exact location of where I took each and every one of them and which then goes onto discuss the techniques and tools I used to process them, but where everything is written in plain easy to understand English? Then please consider buying the Book. |
|